


Source: mindbodygreen.com, buzzfeed.com, & organichealth.co

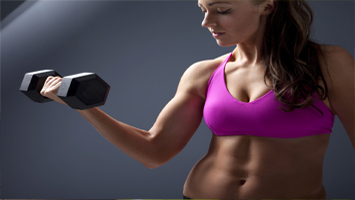
Planks are one of those exercises that will never go out of style, and for good reason. When it comes to core workouts, no exercise beats the plank in terms of effectiveness and time (not even crunches).
This move challenges the entire body and burns more calories than a traditional crunch. It’s also much easier on the back and can help prevent injuries.
Here are nine reasons to add planks to your workout every day:
1. Get major core definition

Planks engage the transverse abdominis, rectus abdominis, obliques and glutes. This is important because each muscle group serves a different purpose and gives you different definition.
The transverse abdominis increases abdominal pressure so you can lift more weight. It also helps to flatten out the stomach. The rectus abdominis improves performance in sports that require jumping and it gives you the six pack look. The obliques are responsible for side bending and waist twisting moves. Developing these muscles also give you that nice hourglass shape. The glutes support the back and give you a strong, shapely booty.
2. Reduce the risk of injury

A strong core gives the body the ability to perform movements in all planes of motion. In order to perform sports or daily activities without pain, it’s essential to have a strong core. Planks are a safe way to build muscle and protect the spine and hips during movement.
3. Make your abs tight

4. Workout anywhere

Planks are a great go-to move while traveling or in a confined space. You don’t need any equipment or much space, and if you’re short on time, you can still get an amazing workout just doing planks. Drop down and do a set for a quick metabolism boost and calorie burner.
5. Improve posture

A strong core translates to an upright body. You’ll stand taller and be less likely to hunch over with a strong foundation. The muscles in the core support the spine, which is what contributes to great posture.
6. Make your back strong

7. Improve balance

A solid core increases stability in the entire body. It’s essential for balance and coordination. If the core is weak, it’ll be much more difficult to find equilibrium. There’s a reason yogis have great balance — their core supports every movement they perform and keeps them in alignment.
8. Sculpt your arms.

9. Whole body workout

Another good reason to plank is because, it not only works your core muscles but your entire body. It is a great full body workout, and it is also versatile! You can add weights, cardio, or just move your body and get different results.
Convinced? Here are four basic planks to get you that killer core in no time!
Forearm Plank

Come onto your forearms with legs extended straight back. Clasp hands and bring elbows directly under the shoulders. Come up onto the balls of your feet, forming a straight line from head to heels. Draw belly button in toward your spine. Engage quads and glutes the entire time. Hold for at least 30 seconds, up to one minute.
Side Plank

Come onto your right forearm with elbow under shoulder and feet stacked. Lift hips up as high as possible, forming a straight line from head to heels. Extend left arm directly over shoulder and press right hand into the mat. Keep core engaged the entire time. Hold for 30 seconds each side. For an extra challenge, lift your left leg up as well (photo).
Straight-Arm Plank

Place hands under shoulders and come up onto the balls of your feet. Keep arms straight and gaze toward the floor. Squeeze shoulder blades together and draw your belly button up toward your spine. Keep quads and glutes engaged the entire time. Hold for at least 30 seconds, up to one minute.
Straight-Arm Plank With Shoulder Touch

Place hands under shoulders and come up onto the balls of your feet, keeping feet wider than hip-width. Keeping hips still, bring right hand up to touch left shoulder. Return to center and bring left hand up to touch right shoulder. Continue to alternate, keeping torso and legs as still as possible. Perform for at least 30 seconds, up to one minute.
How To Get The Most Out Of Plank Pose
Source: mindbodygreen.com
Almost every yoga class features at least one plank, yet very few can honestly say that they know completely what’s going on in Plankasana. Most view it as a great core asana, yet few actually access their true core, and many are cheating themselves or hurting their backs by allowing their arms to do all the work.
To help you take full advantage of Plankasana, here’s an overview of this widely used, but often misunderstood asana.
1. Pick your variation.
Will you be practicing on your hands or on your forearms? If you’re going to be practicing on your palms, set up your hands shoulder distance apart and align the wrists under the shoulders. With your middle fingers pointing forward, press your entire hand into the floor, keeping a bit more weight in the knuckles.
From the shoulder, rotate the folds of the elbows forward, without hyperextending the joint (they look like they’re bending in the wrong direction). This is important so that you’re able to shift the load down into the core and prevent the shoulders from doing all the work. Without hunching, slide the shoulder blades down your back.
If you prefer planking on your forearms, get out of the habit of clasping the hands together in a triangle shape. This puts an emphasis on the pectorals, rather than the core. By opening up the arms to a shoulder width, you again shift the load to where it belongs. Turn the palms inward or upward when practicing, rather than down into the floor. Shift the weight evenly throughout the entire forearm and you’ll notice a significant increase in core power. Use a block between the palms for more core strength!
2. Get your legs in gear.

Your inner thighs are your pelvic floor’s favorite neighbor (way more than your butt). Bring your feet together so that they touch, engage your thighs inward toward each other, then press the quadriceps upward without hiking your buttocks. If you pay close enough attention, you should notice some activation in your pelvic floor area. By placing a foam yoga block or mini ball between the lower part of the thigh, you can generate more action in this area.
3. Resist gravity with the core.

Align your pelvis in neutral (ASIS and pubis bone make a triangle shape that runs parallel to the floor), and resist gravity. By resisting gravity, you’re turning on your transversus abdominis, the hoop-like muscle at the deepest layer of the core. This is where the stability of plank begins.
Think of plank in thirds: 1/3 arms, 1/3 legs, 1/3 core. When you break down plank this way, you can focus on each section of the body and create better stability. Once you’ve successfully positioned yourself, check to make sure your head isn’t sagging (it puts more pressure on your wrists), and create length from your heels pressing back (not touching the floor) and your crown stretching forward.
Grab a partner and ask your partner to take her first two fingers and open them up like an upside-down V. Take that V and place a finger on each side of the lower spine. As she presses down on your lower back, resist her without pushing your buttocks upward or sagging down towards the floor. What you should feel is a quiver. This is the transversus abdominis earthquake.
Remain in Plankasana for up to 10 breaths, limiting belly breathing and maximizing side body breathing.
In Plank there should be zero back pain and no hip flexor pain. This can take time to perfect, especially if you’ve used everything but your core to do the core’s job throughout your entire life.
If your shoulder blades look like wings on an airplane, press into your palms and work to lift the rib cage up away from the floor. If you fall into this category, you’ll benefit greatly from the scapula push-up.
If you’re the opposite and you overly round your upper back (still avoiding your core), you’re probably overexerting your arm and chest muscles. Try sinking your chest a bit; as a teacher I often rub my hand on the upper back to help smooth out this area.
The next time you practice plank, take a few extra moments to explain it thoroughly to your students or run through the tweaks yourself. Your core will thank you later.
Here’s a video if you’d like more advice on this pose.
Happy Planking!


