


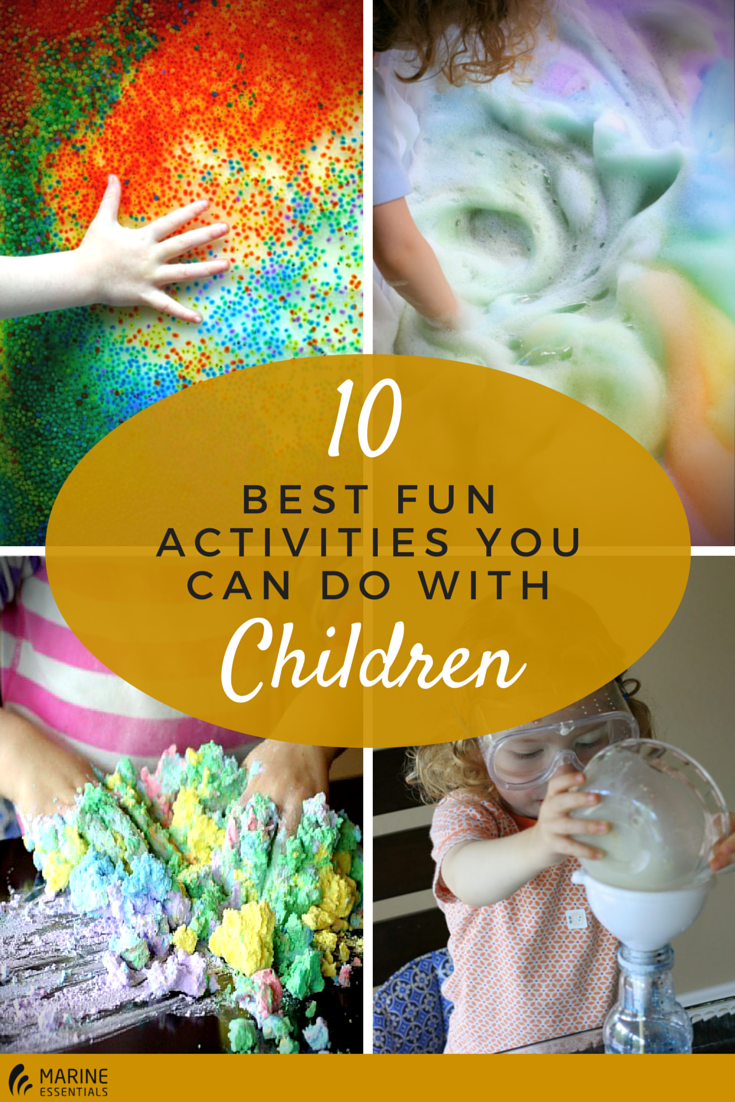
Source: aplus.com
When Asia Citro realized her children didn’t exactly “believe in sleeping,” she set out on a mission to keep them entertained in a healthy way.
That mission was to create a fun, educational environment for her children at home, and to do it in a way that was fun for her, too. After posting a few of their activities on Facebook and receiving tons of positive feedback, Citro decided to create her own blog.
“I really didn’t think it would go anywhere because there are so many blogs,” Citro told A+. “I was really lucky a couple of my first posts went viral on Pintrest.”
They went viral for a good reason: Citro’s activities are like nothing we’ve ever seen before. They combine colors, smells, tastes, and textures that would be irresistible for any child. The former science teacher worked hard to perfect her sensory play activities before posting them online.
“A lot of them take me months to figure out, which I know sounds dorky but it’s totally true,” she said.
Below, we’ve compiled 10 of the coolest sensory play activities Citro has put online, with links to their respective posts on her site.
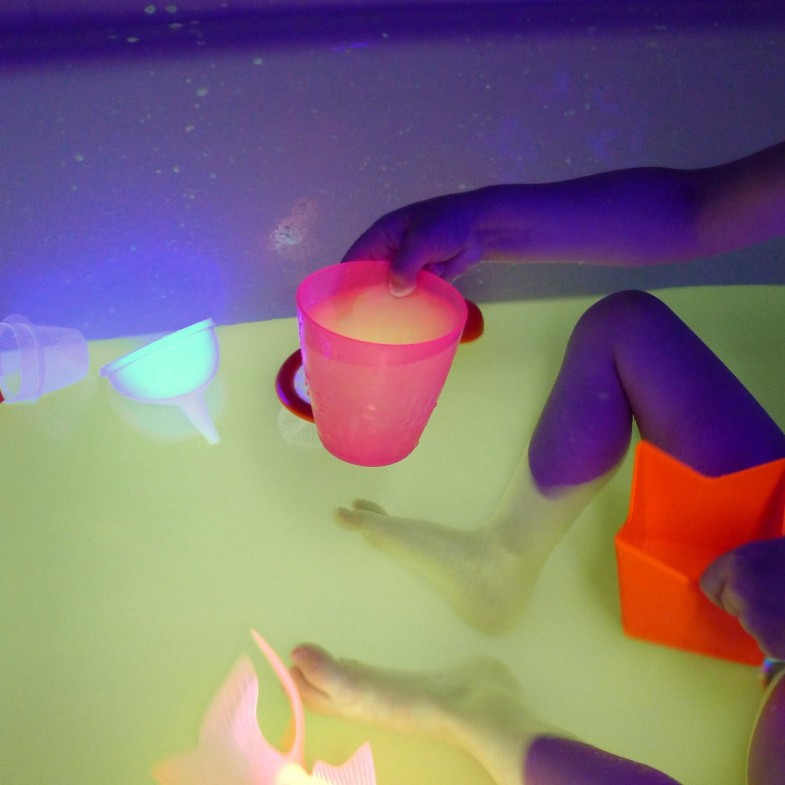
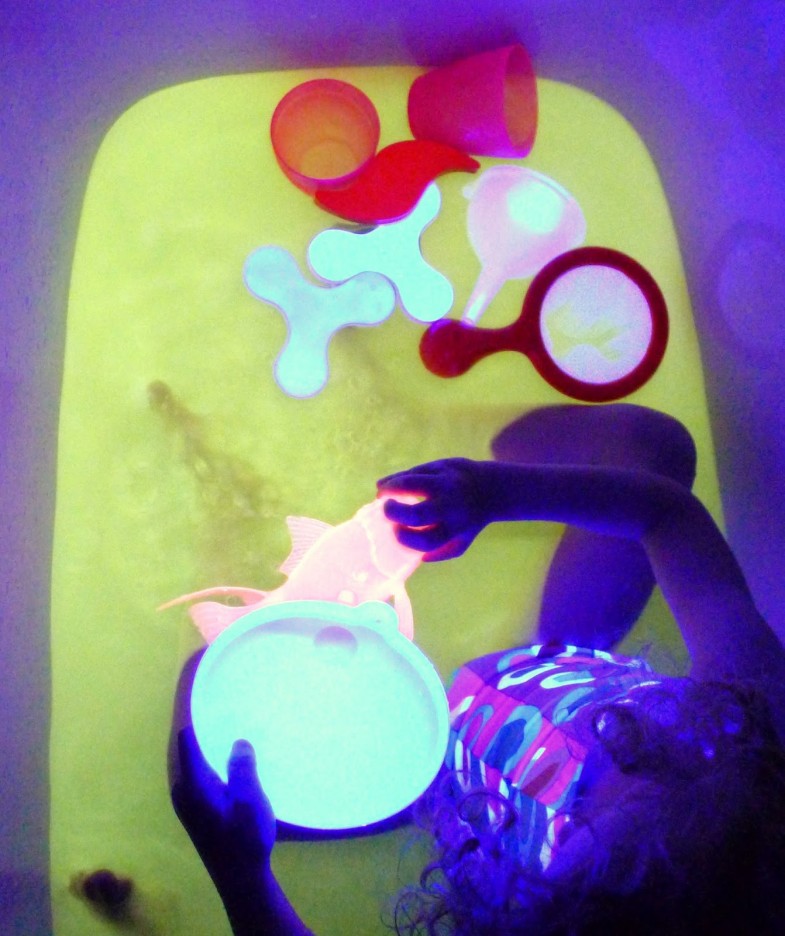
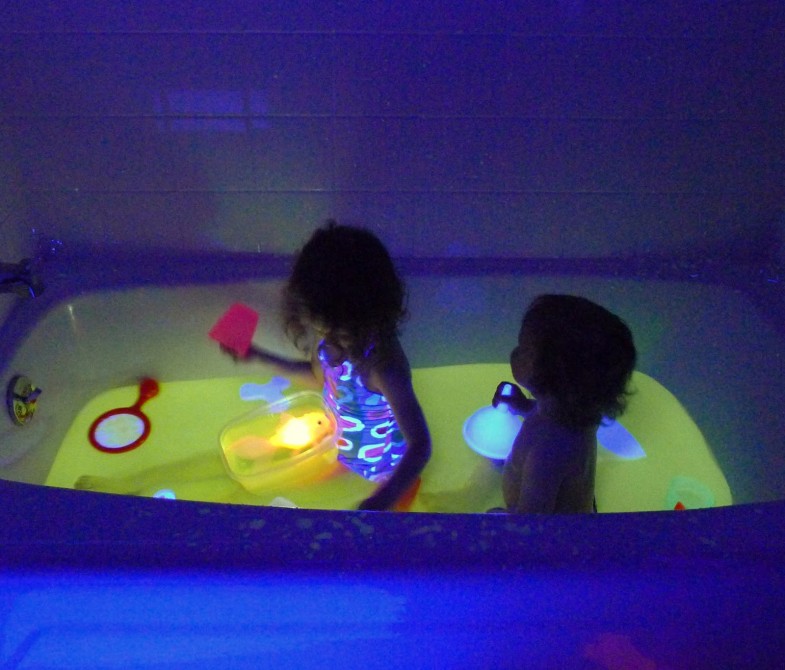
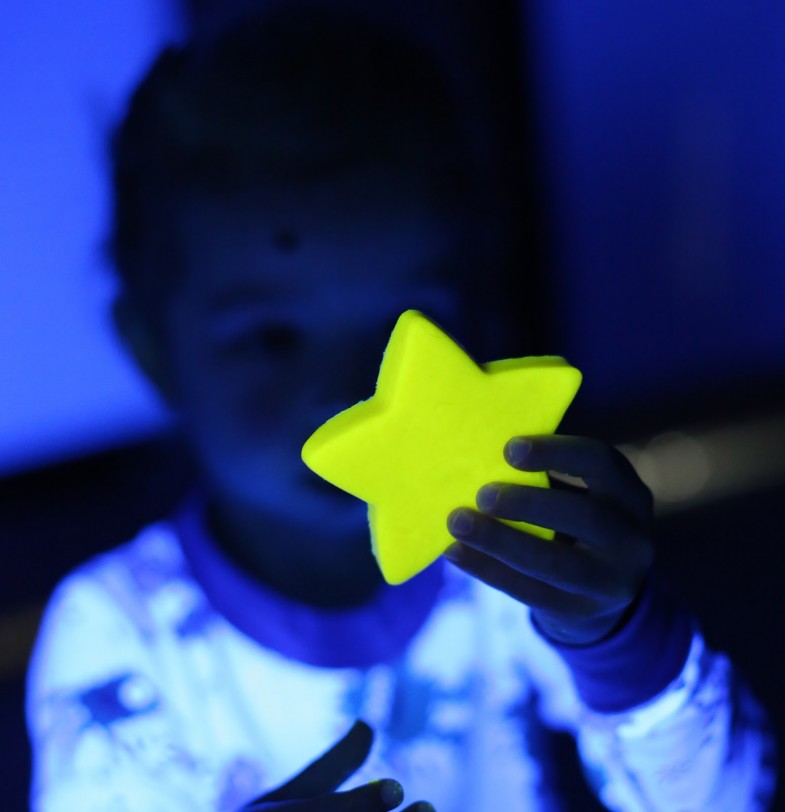
Safe (and edible) glowing water for baths
Source: funathomewithkids.com
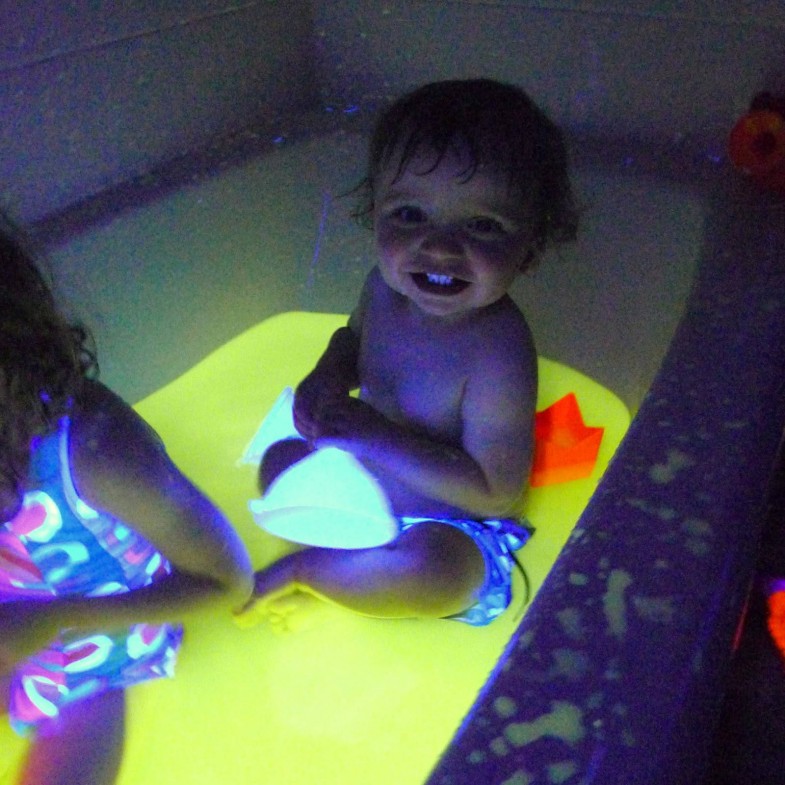
A little Googling found me this list of things that fluoresce. Some more Googling led me to believe that I wanted a B vitamin high in Thiamine if I wanted a really great glow with a blacklight.
So off we went to the store to see what we could find.
We found just the perfect vitamin, and brought it home. To make our safe glow water we combined:
Two of this vitamin, crushed <—- CLICK for the vitamin details
(Each brand calls it something different – to be sure you are getting the correct vitamin (not all glow brightly), either buy this one via Amazon or write down all the ingredients and amounts and find a B vitamin whose ingredients match these at the store)
Warm water
Using a kitchen mallet and ziploc bag, have child help pound the vitamin into powder and add it to a glass of warm water and stir. Once it is pretty dissolved, add the cup of vitamin water to a tub of regular water and swished it around. Now just to be totally clear, though this is edible, it’s not intended for kids to just drink down by the cup full. The vitamins are adult strength. They are super diluted of course, but please don’t serve your child a cup of glowing bath water. It is, however, not a problem if they accidentally splash some in their face or mouth, or get a stray mouthful or two. For those of you with concerns about absorption (There is no research indicating that this amount of dilute vitamins could/would be dangerous in any way and my pediatrician’s office confirms that this amount is too dilute to absorb through the skin), you can dramatically reduce the amount of vitamin per several gallons of water and still have a great glow. For reference, this is about the amount in an energy drink. If you have concerns about the use of a blacklight, I again encourage you to contact your pediatrician. As with all play materials/activities, the decision is yours.
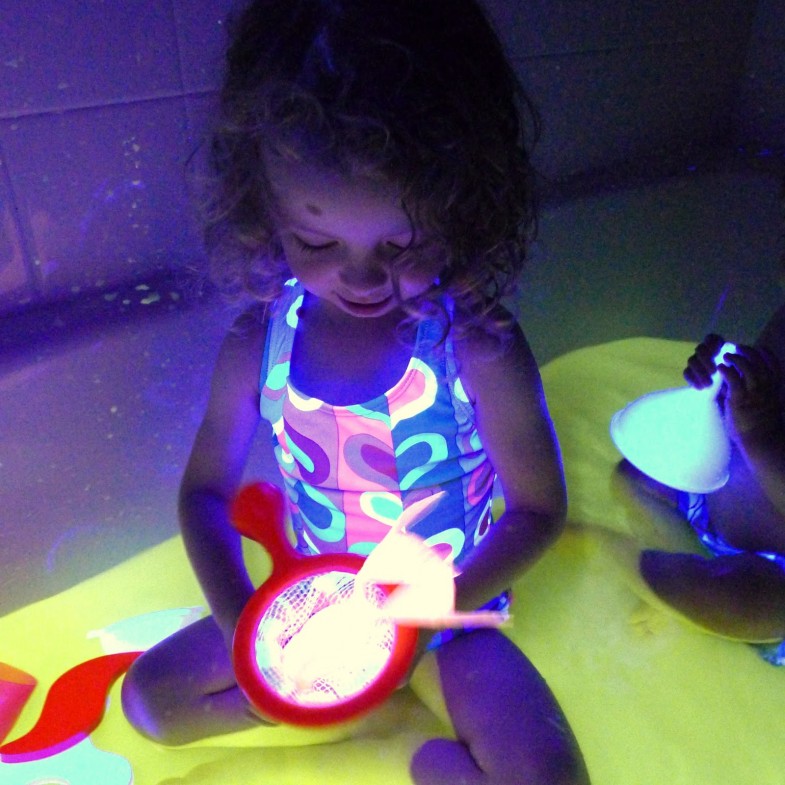
I originally intended for the kids to play in a big bin of water, but couldn’t find one that would fit in the tub while they were there. And the brilliant thing about this is that it is super safe. It’s not sticky. It’s just perfect for a glowing bath. So that’s what we did!
This post contains affiliate links for your convenience.
Though our bath glowed brightly with just one crushed vitamin, it was even brighter with two, so that’s what we ended up doing. I did a bunch of digging on Amazon and found THIS VITAMIN whose composition exactly matches our store-bought vitamin (and if you make your baths the same way, it will cost you on average just pennies a bath – cool!). If you want this very vibrant glow I’d recommend either buying the one I linked to or jotting down the quantities (there’s a photo in the Amazon store that lists all the information) for when you go to the store, as I suspect the results vary a lot depending on the vitamin’s composition. Ours was Kroeger Brand, if that helps anyone. You will also need a Blacklight, as this is a fluorescing reaction – not a glow in the dark (like a glow-in-the-dark paint might be).
**Please use caution with a plugged in blacklight and water, as you would with any plugged in device and water – use with a GFI outlet – standard to all bathrooms built to code**
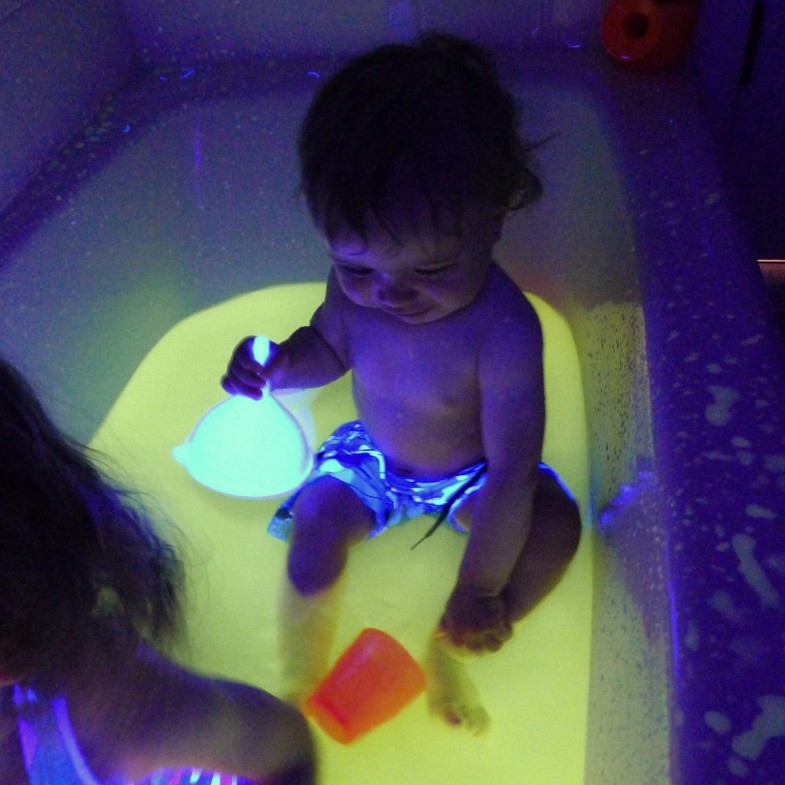
Rather than make a fancy bath (I just am not that creative!), we just collected several items we already had that fluoresced (it was a fun scavenger hunt!) and added them all to the bath:
White Dollar Tree Funnels
Boon Bath Shapes
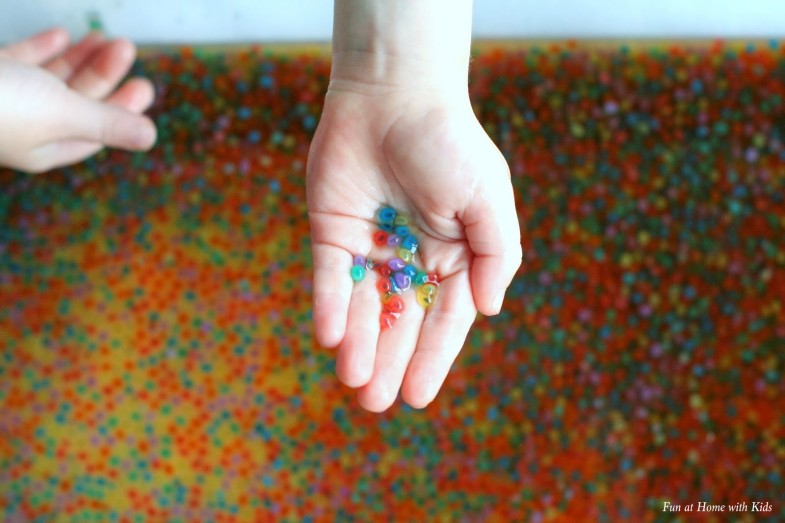
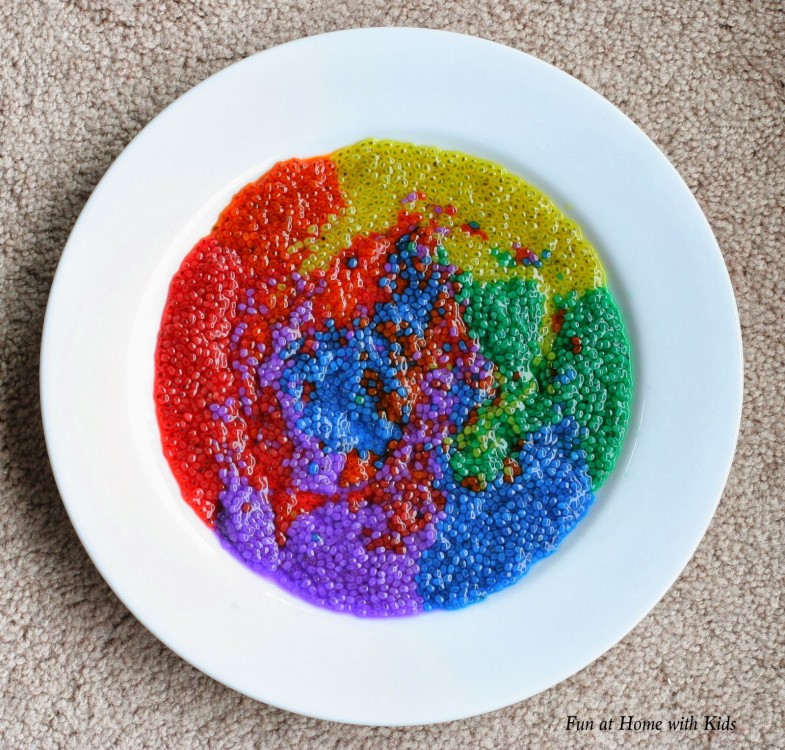
Safe and edible miniature floating beads
Source: funathomewithkids.com
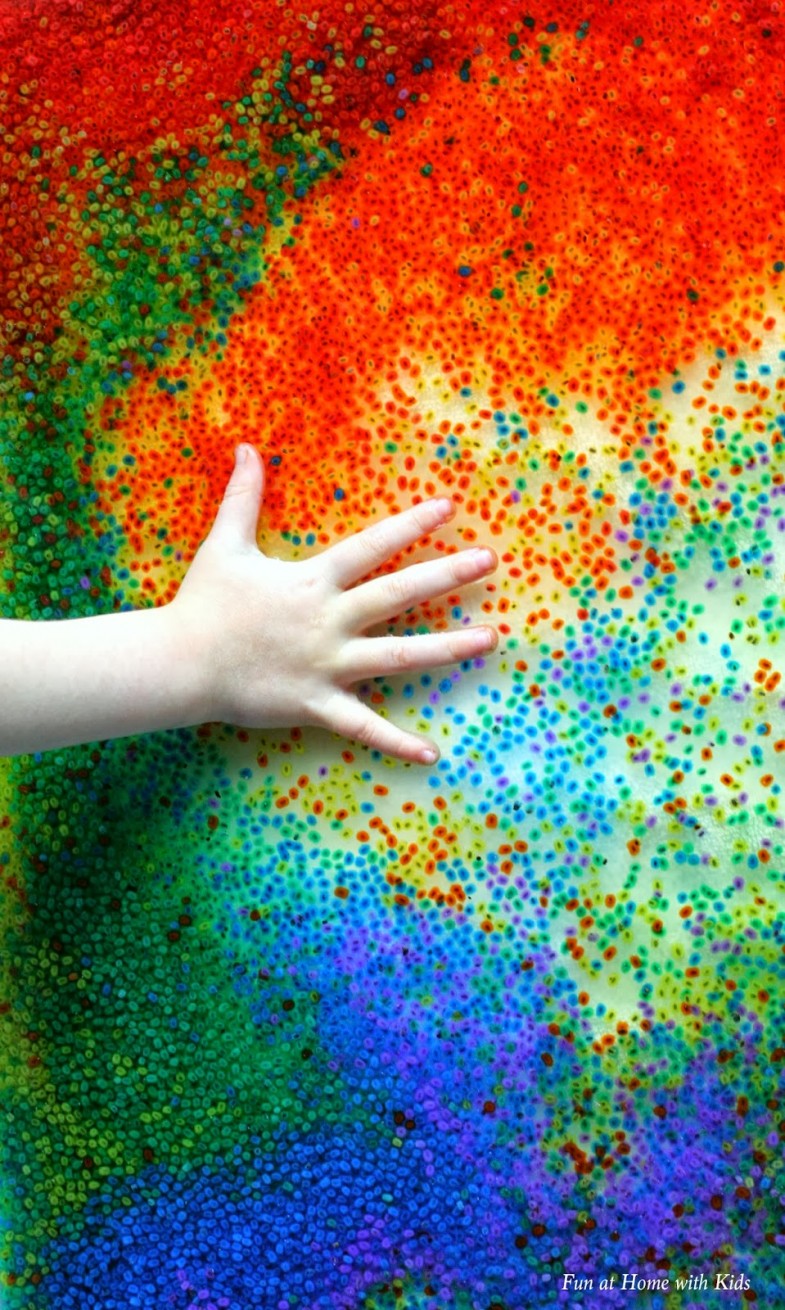
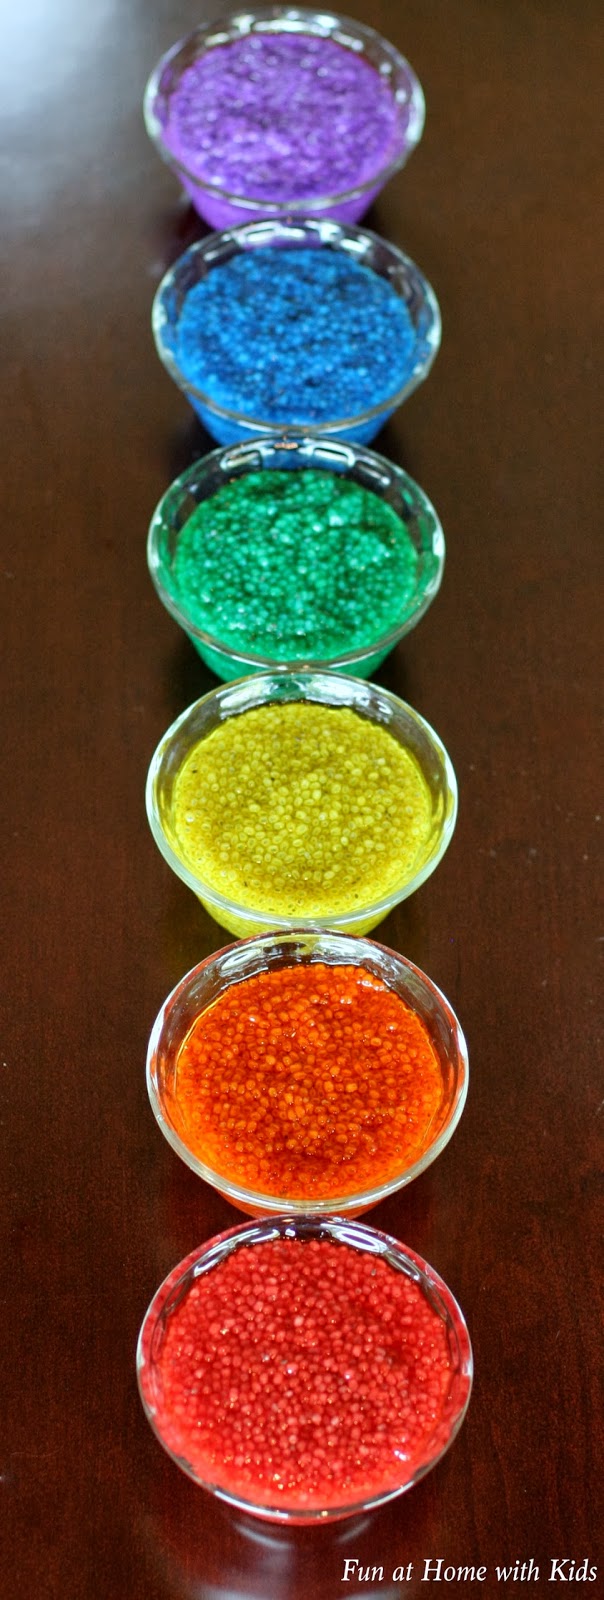
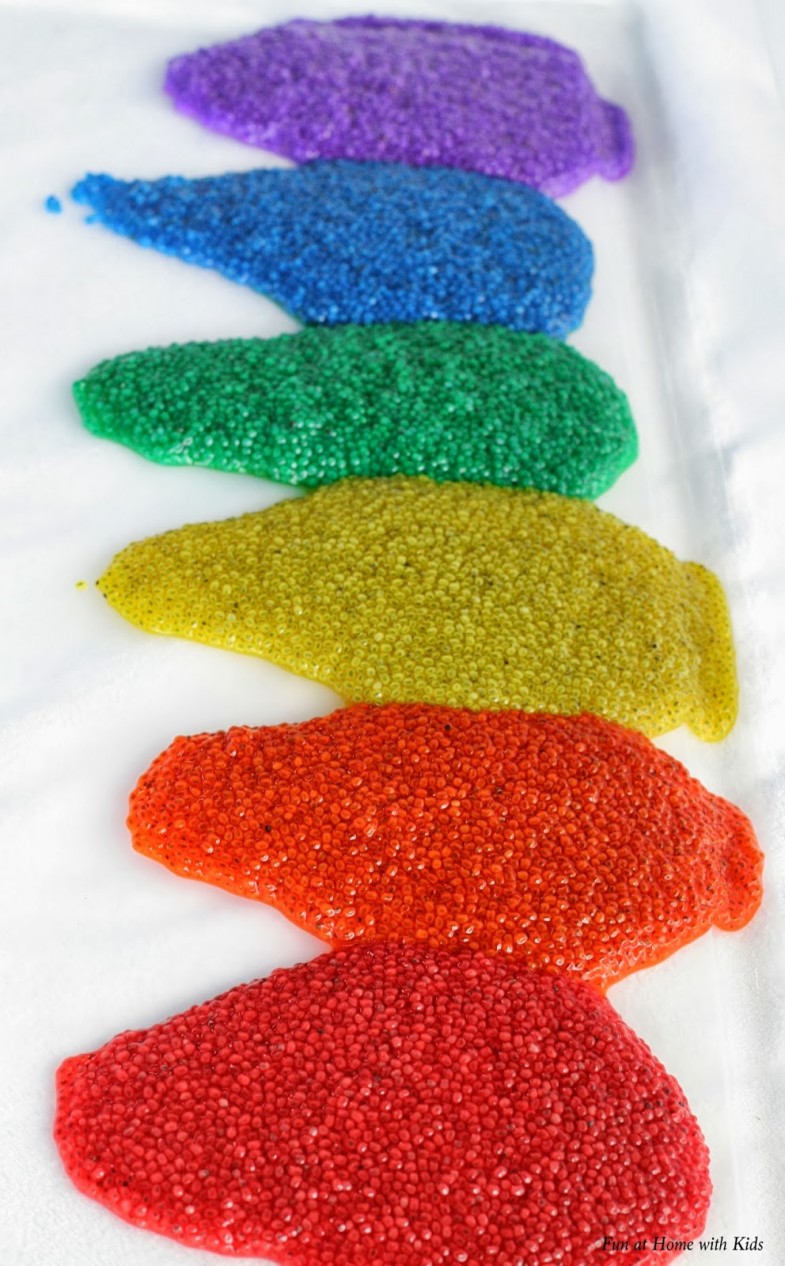
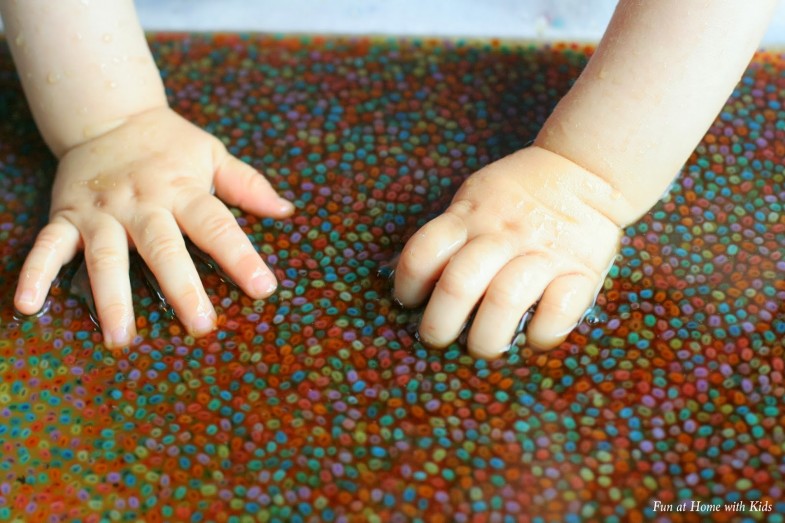
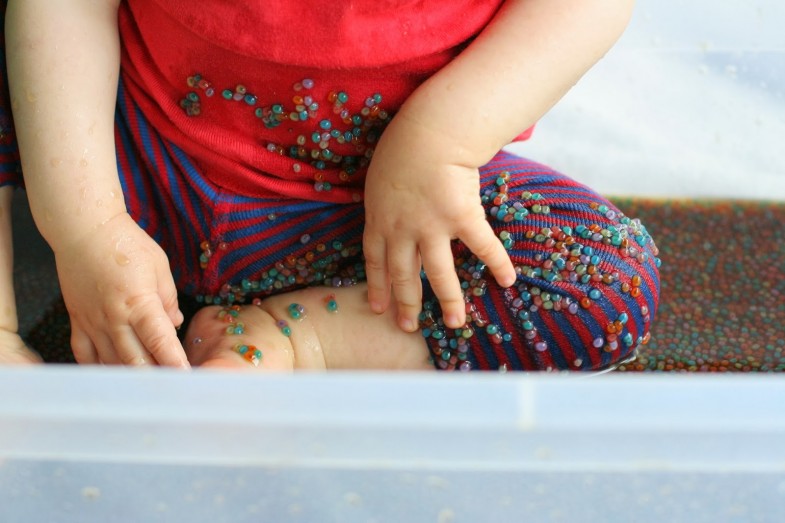
If you’ve ever wondered why we don’t use the traditional manufactured water beads in our sensory play, it’s mainly because we have a substitute that we like better. Our “mini water beads” are inexpensive, not chokable (they are small enough to not present a hazard), they take just a few minutes to set up, and they are totally edible. They are much smaller than manufactured water beads, so we call them mini water beads, but they behave incredibly similarly to the manufactured water beads. I love that they are such a safe and edible alternative – with both cats and a little one, it’s nice to not have to worry about anyone accidentally ingesting something dangerous (I’m a worrier). Not to mention, our safe edible mini water beads are gorgeous, right?
To set them up, I soak them in whatever colored water I want the mini water beads to be. This step takes less than five minutes.
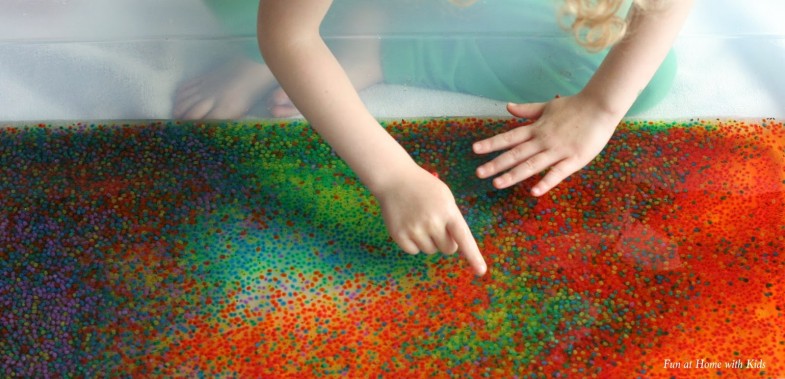
Then I dump them into whatever bin we’re using and ooh and aah over the gorgeous colors. They look a little like tiny gems to me. They natural stick together a bit, so once we’re ready to play, I add a small amount of water.
Then dive in and mix them up. For the record, this is one of my favorite photos ever.

As the colors mix and swirl, it’s quite the show.
As you can see, they’re very small. But they do have a very similar texture to manufactured water beads, as they are also made of a gel that holds water.
They’re really soft and they like to stick together a bit, so they move as a wave when you swish them (I couldn’t get any good action shots of that, so you’ll just have to trust me on that one).
If this is your child’s first tie experiencing them, they may naturally want to climb right in.
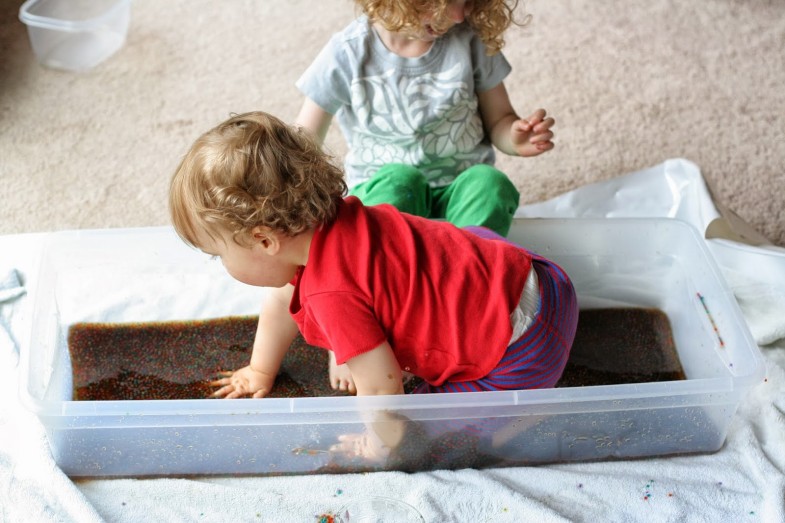
They will discovere something we wouldn’t have otherwise – our mini water beads stick to clothes. Like reallllllly stick. They generally play with their hands and arms – and we have no issues. But hoo boy do these beads stick to clothing. And towels. You can pick them off for sure, but it’s a pain. So I would recommend either not letting your kiddos climb in or having them play sans clothing to save yourself a headache.
They even make pretty art! It’s so fun to swirl and mix them.
This post contains affiliate links for your convenience.
Now to teach you how to make your own! Again, let me clarify once more that they will stick to clothes and towels; please keep that in mind when deciding where and how to play with them.
1 Tbsp of this Basil Seed
(**I’ve been hearing that some of the basil seeds on Amazon are not working – I think they may have been stored incorrectly by the seller. Here’s an alternative non-Amazon listing for the seeds)
1 and 1/4 cup water
Food Coloring or Liquid Watercolors (use food coloring if you think your child may taste these)
Add the coloring to the water, if desired. Soak 1 Tablespoon of the basil seeds, stirring occasionally. Within about 5 minutes, they will have absorbed all the water. When you are ready to play with them, add a little extra water to your container to allow them to move a bit more fluidly (otherwise they tend to stick to each other and hands).
Where do you find Basil Seeds:The best place to find basil seeds is in an Asian or International Specialty Food Store: Our local Asian Specialty stores all carry bags for $1 and they are in the spices section
Here is a listing on US Amazon
If you wish to substitute chia seeds for basil seeds, follow the modified recipe below:
1 Tbsp of chia seeds
1 cup of water (with added food coloring if you want)
Allow the mixed seeds to sit overnight (or at least 8 hours) in the colored water in your refrigerator for best results.
There are so many fun ways to play with our safe and edible mini water beads! I’ll be sharing several of them in the next week or two.
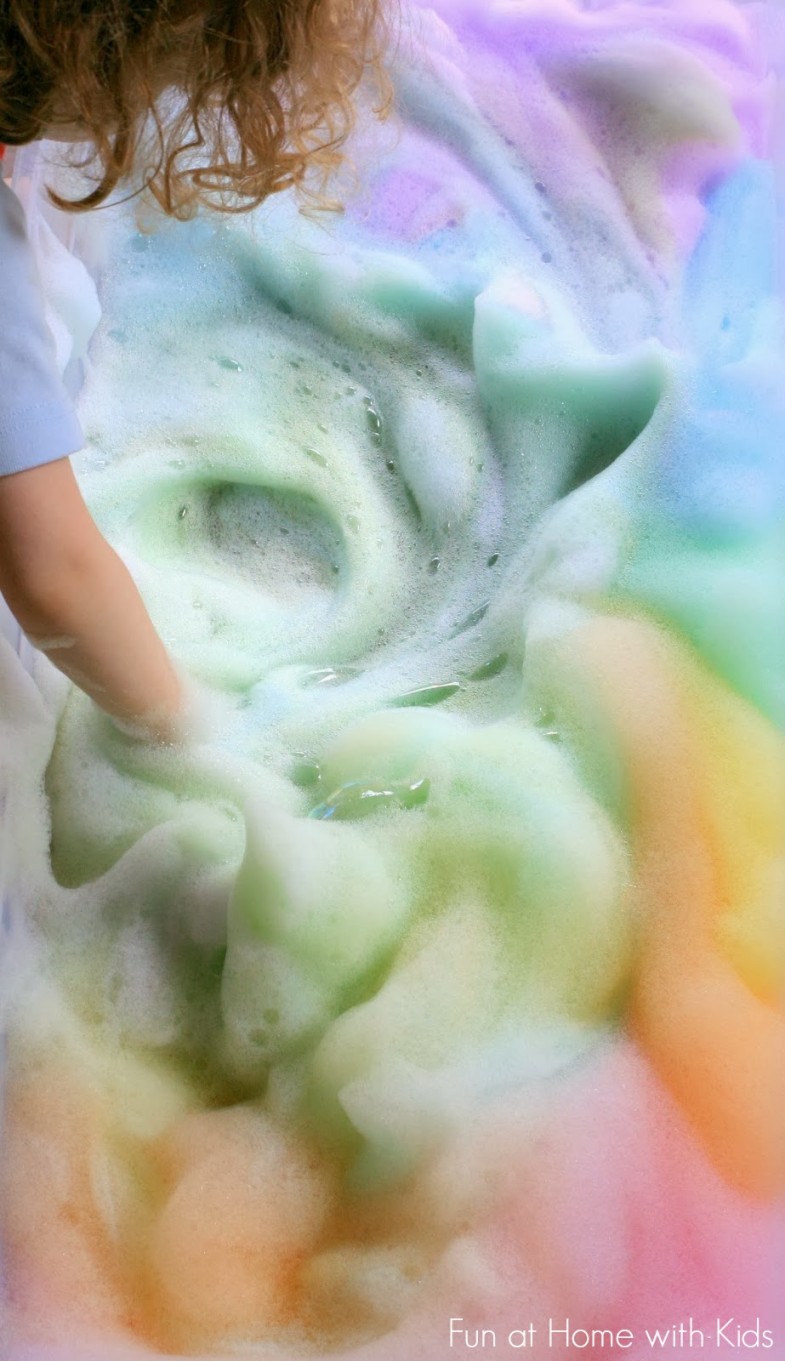
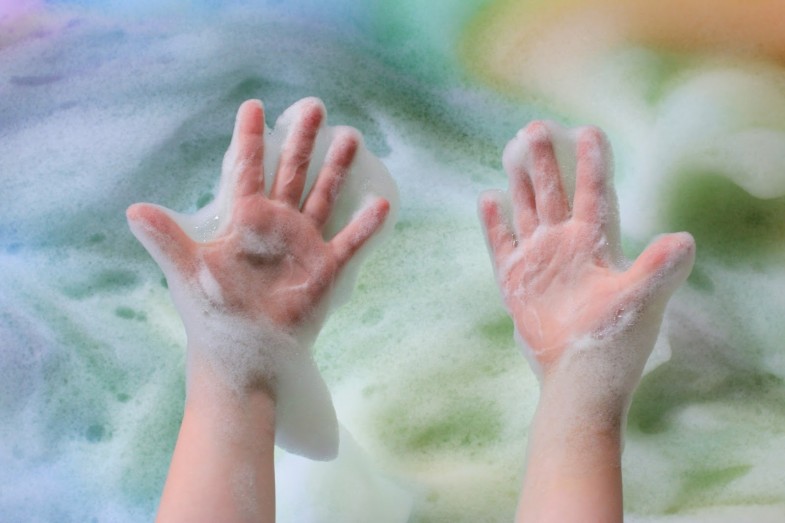
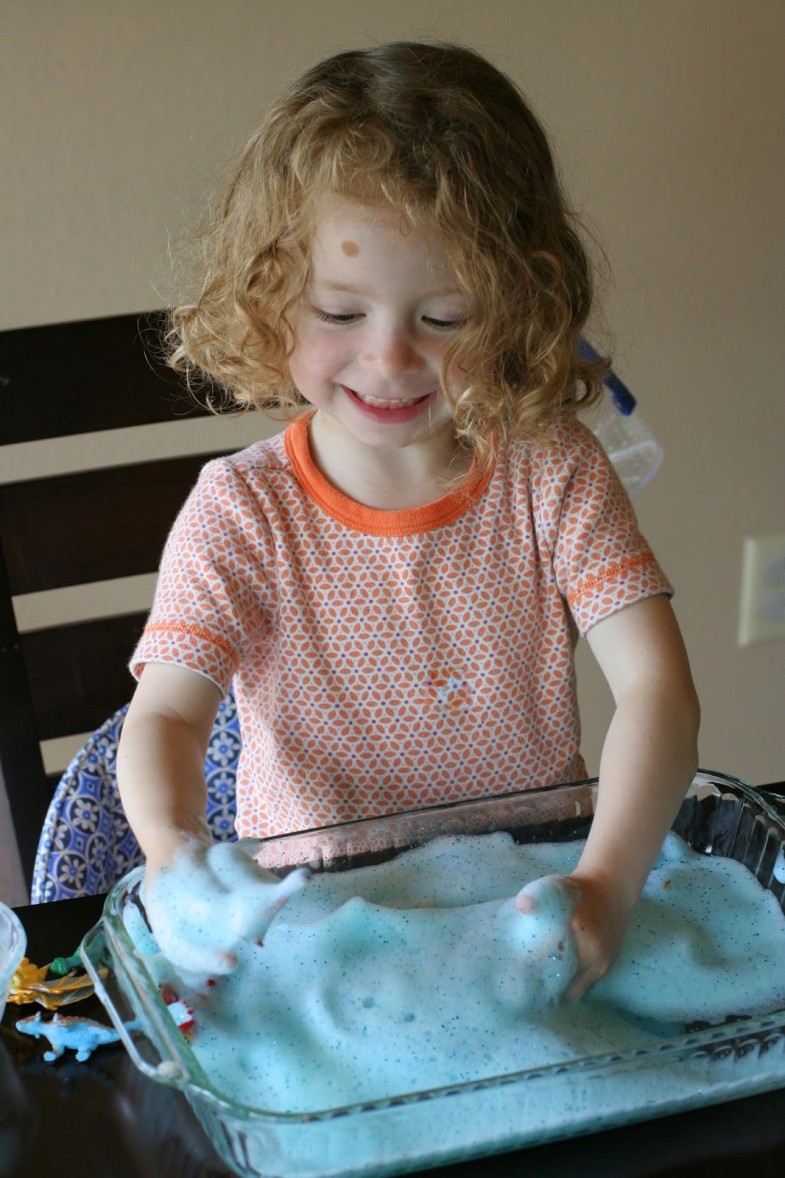
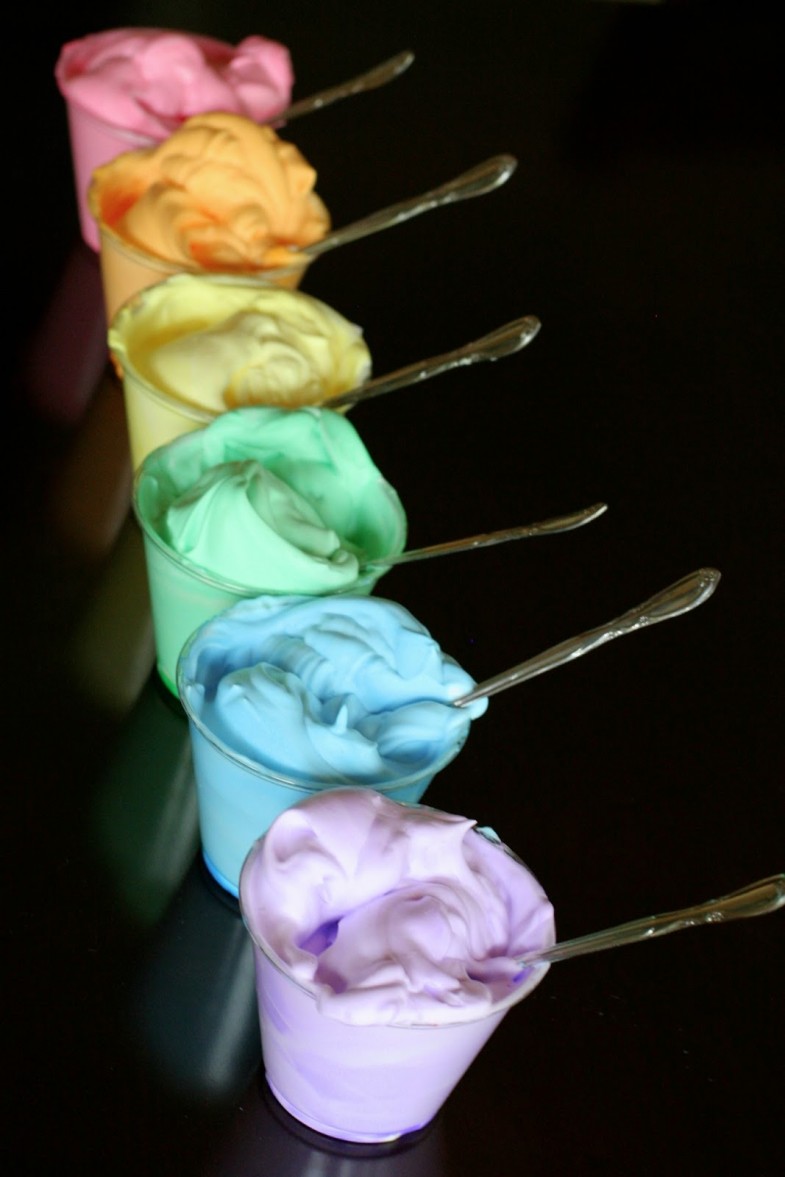
Rainbow soap foam
Source: funathomewithkids.com
This is one of those fun activities that’s quick, easy, and soooo open ended. It took me around 10 minutes total to whip up this huge batch of bubbly, puffy, rainbow soap foam fun.

Don’t you just want to dive right in?
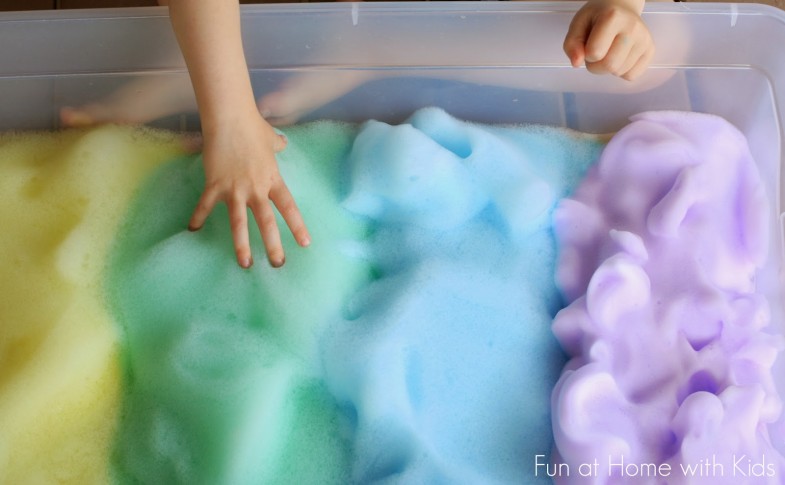
You could make just two primary colors and make it into a color mixing lesson.

You could make it just a sensory activity by itself.
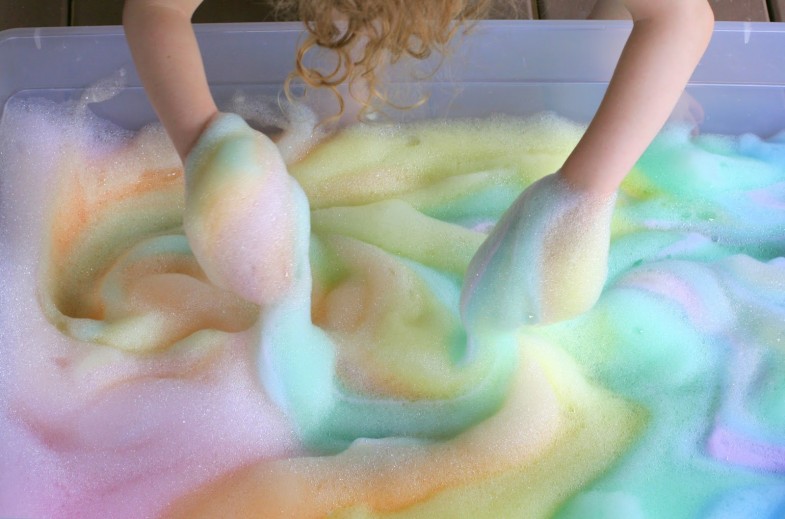
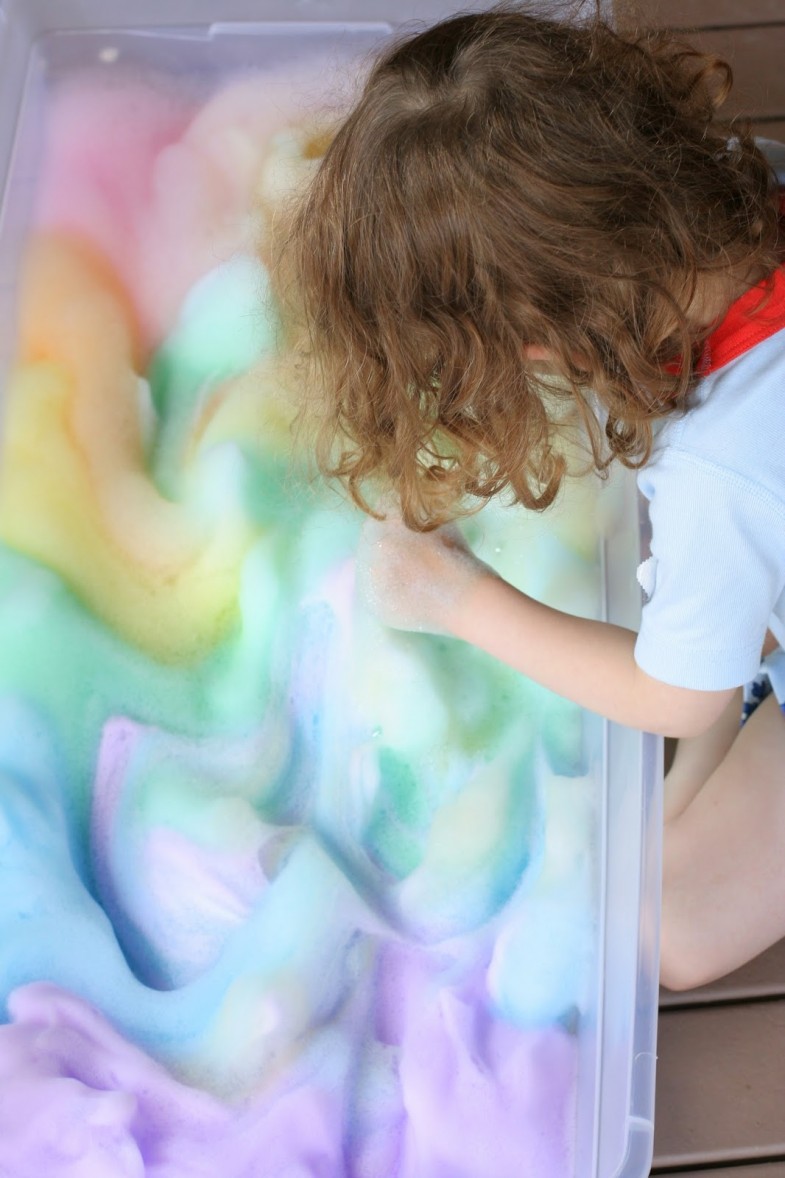
However you work it, there’s something that’s just so much fun about swirling a huge bunch of soap foam.
This post contains affiliate links for your convenience.
All in all, a great time with things on hand! To make your own super puffy fluffy soap foam, you will need:
2 Tbsp of dish soap (we used Dawn Dish Soap
1/4 cup water (please note if your tap water is especially hard or soft, you will need to substitute bottled water so that the soap will bubble well)
a mixer
food coloring or Colorations Liquid Watercolors
In a bowl, add 2 Tbsp of dish soap and 1/4 cup of water. Add food coloring or Colorations Liquid Watercolors
**Please note that we used liquid watercolors and had no staining as liquid watercolors are washable. If you use food coloring, you are very likely to have some staining as food coloring is not washable.**
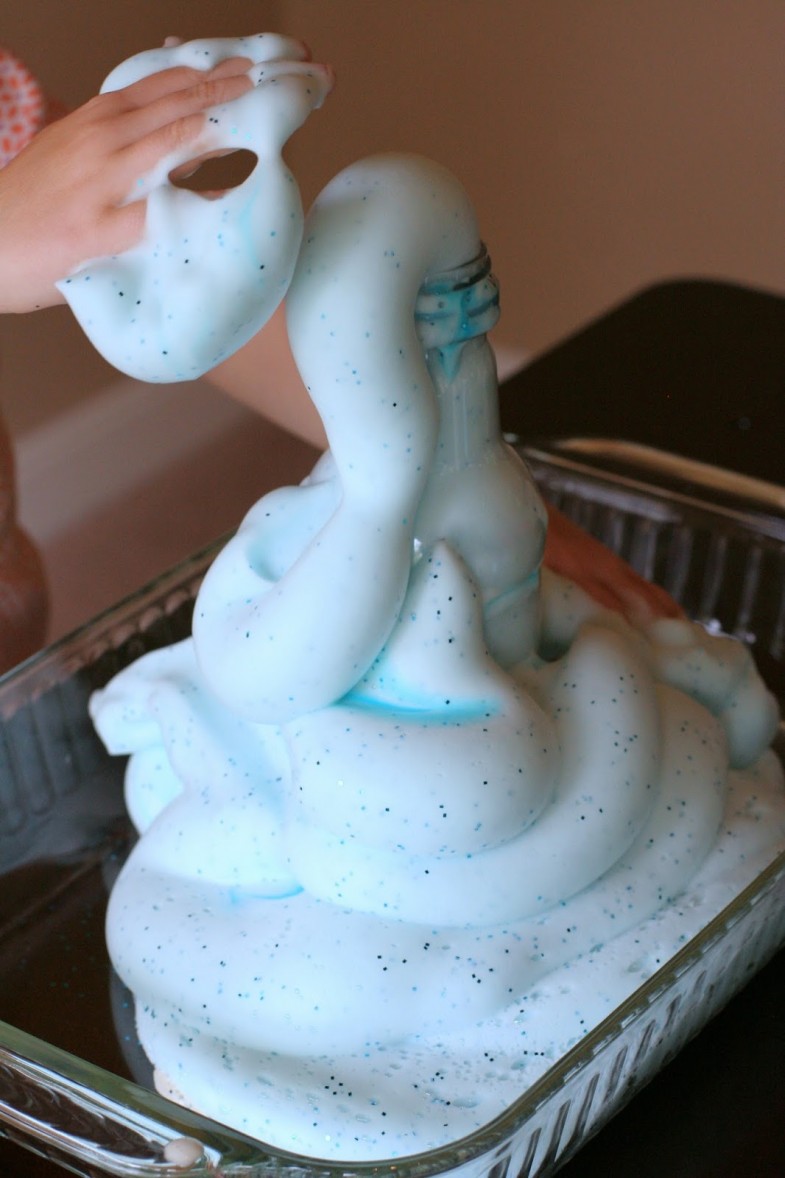
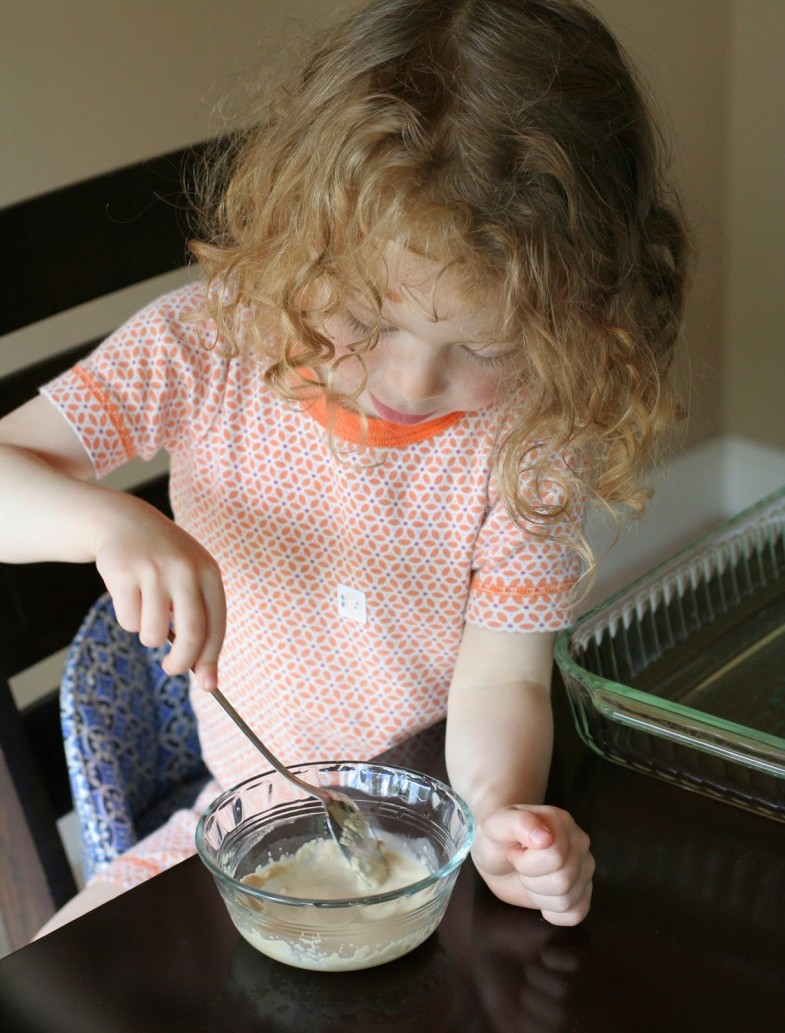
First off, have you child prep the yeast. Have your child measure out the correct amount and added it to the warm water and stirred. I gave it a few stirs at the end to get out one or two yeast clumps, but this is a great step to involve your child in.
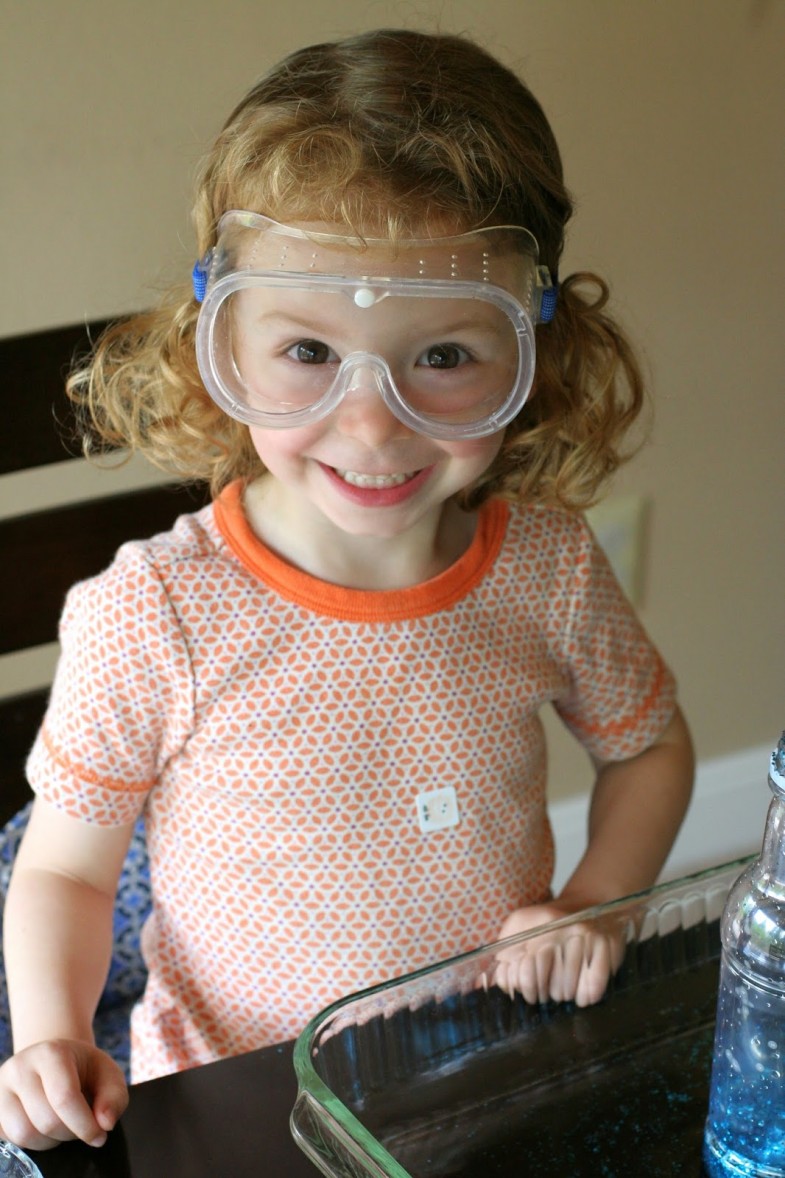
Next have your child put on their safety goggles!
I measured and added the peroxide myself, and allowed my child to add the squeezes of dish soap, Colorations Liquid Watercolors
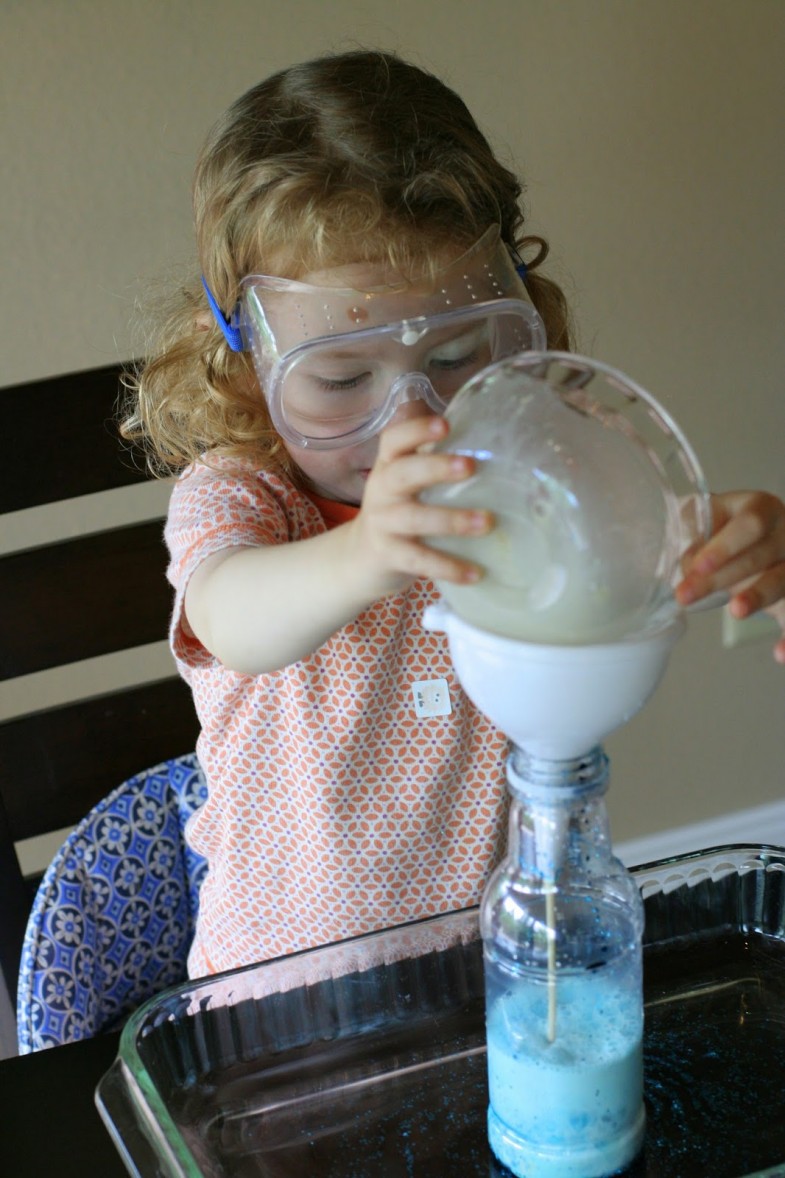
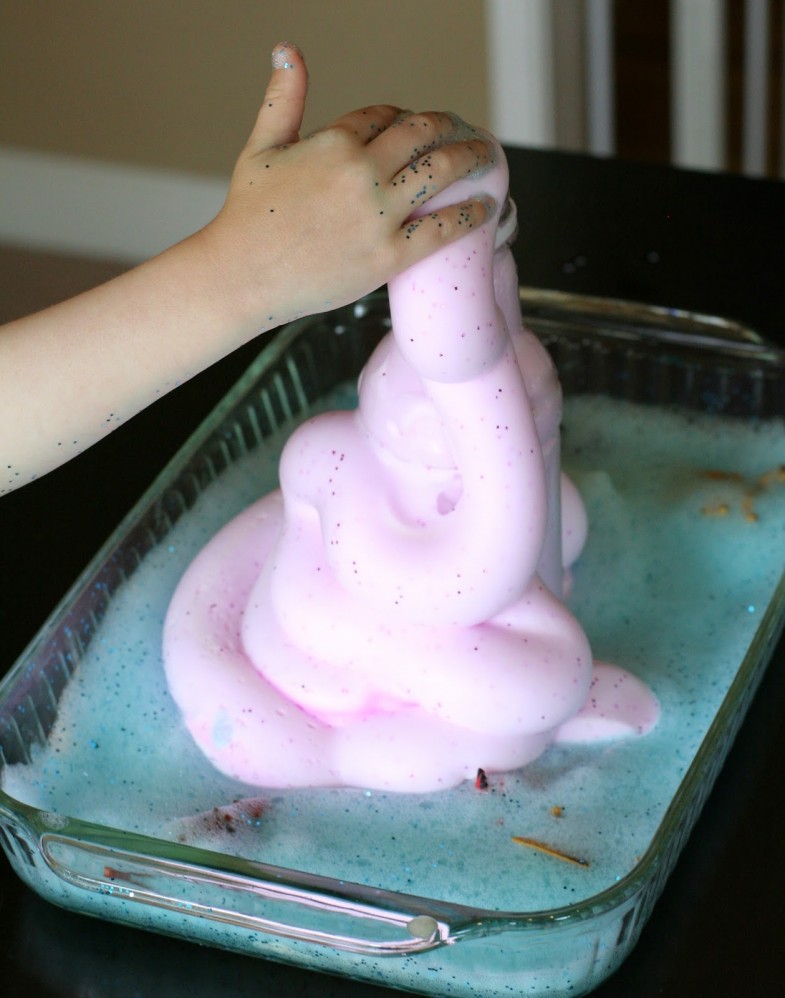
Immediately remove your funnel and watch the crazy eruption of giant foam spill out of your bottle! The foam is totally safe to touch (and so soft and puffy!) – the peroxide (H2O2) is broken down in the reaction – so there isn’t any left. It leaves behind water (H20) and oxygen (O2) only – so again, completely safe to handle.
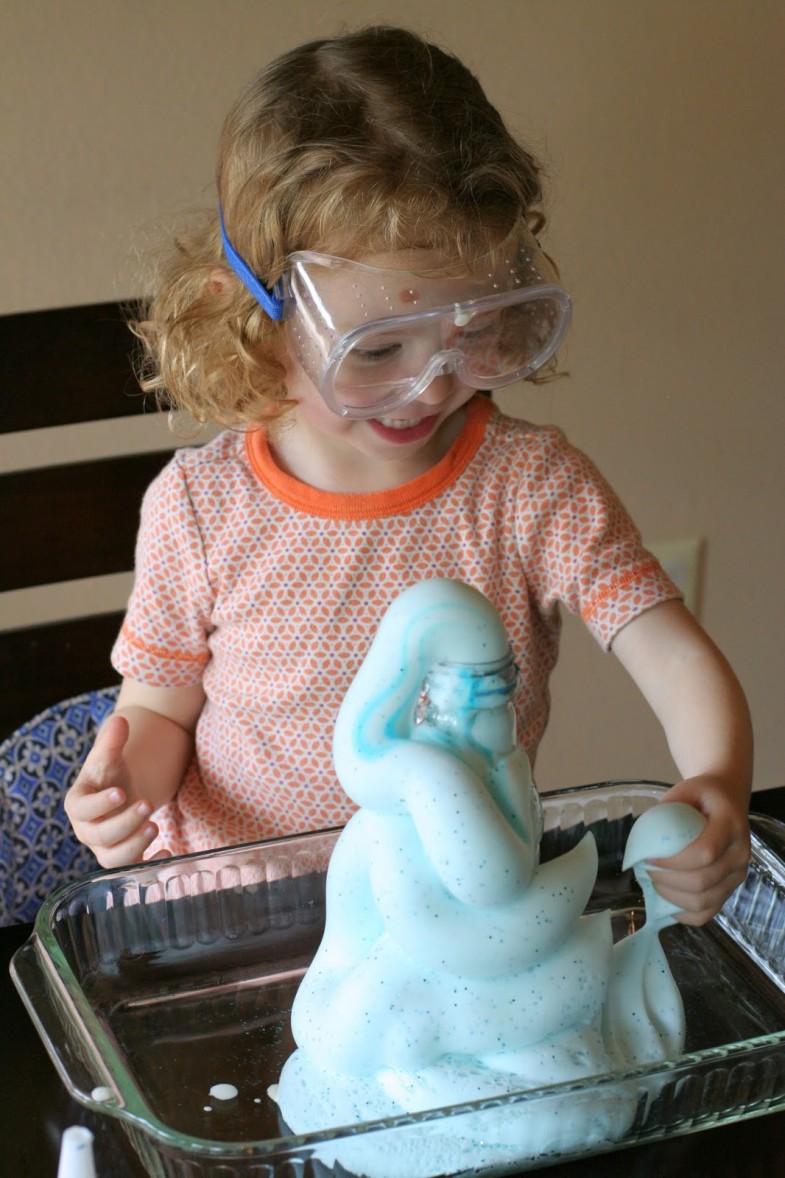
It all happens quickly and is quite the sight!!! The reaction is exothermic, meaning that it gives off heat. You can have your child touch the bottle after the reaction has taken place and they can feel the warmth radiating out. Your child will be so surprised!
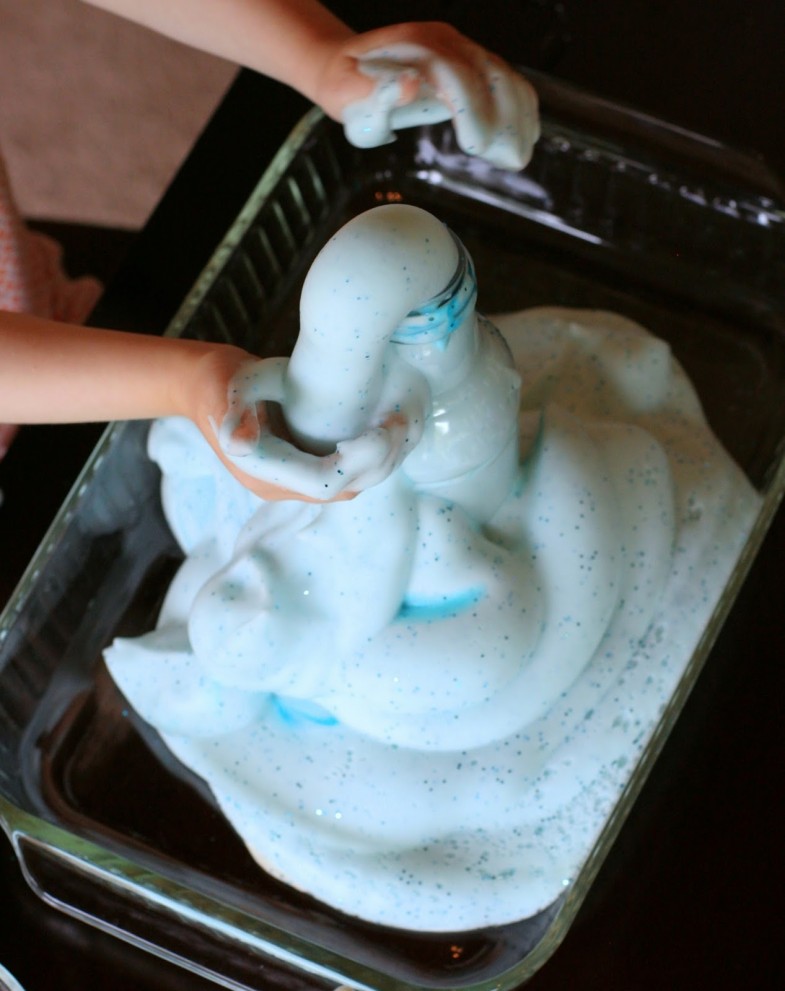
Once the foam has stopped erupting, I removed the bottle and had my child play with some dragons and dinos in the foam.
After awhile we decided we needed to do it just ooooone more time and went with pink this time. It was still the coolest thing ever!!!
This post contains affiliate links for your convenience.
To make your own Elephant’s Toothpaste you will need:
Close adult supervision
Safety goggles for your child if they are going to be involved in any mixing/pouring
Warm Water
6% (20 volume) Hydrogen Peroxide
Dawn Dish Soap
Funnel
Narrow-necked bottle (sized around 15 ounces)
Colorations Liquid Watercolors
Glitter (optional)
6% (20 volume) Hydrogen Peroxide
Measure 1 teaspoon of yeast (half of one of those little pouches it comes in) into 2 Tablespoons of very warm water. Mix well.
Into your narrow-necked bottle, add 1/2 cup of 6% (20 volume) Hydrogen Peroxide
Place your bottle in a container to catch the mountain of foam (we used a glass baking dish), then add the yeast mixture through a funnel. Quickly remove the funnel and enjoy the show!
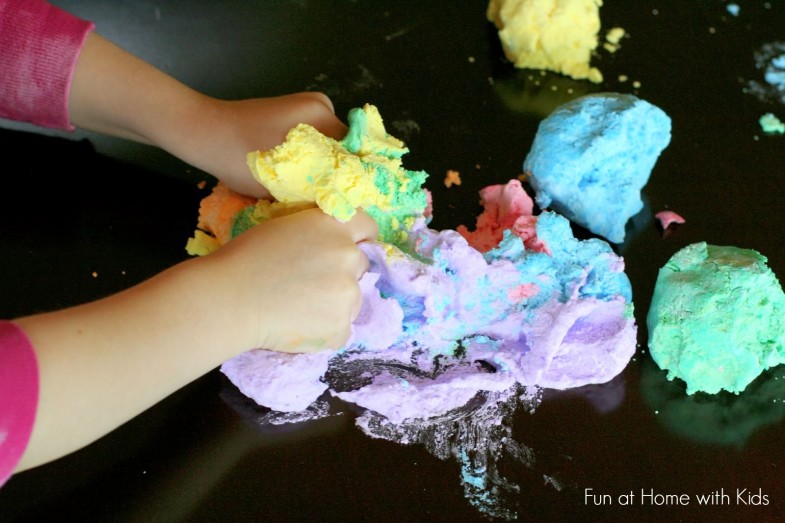
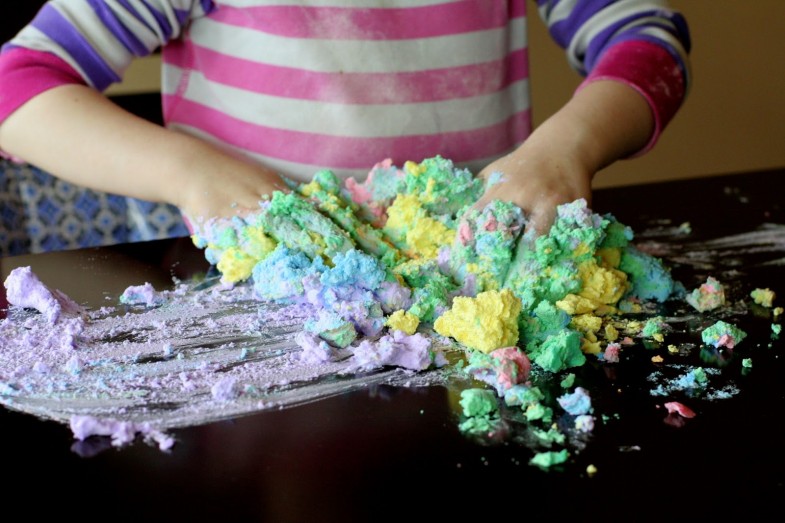
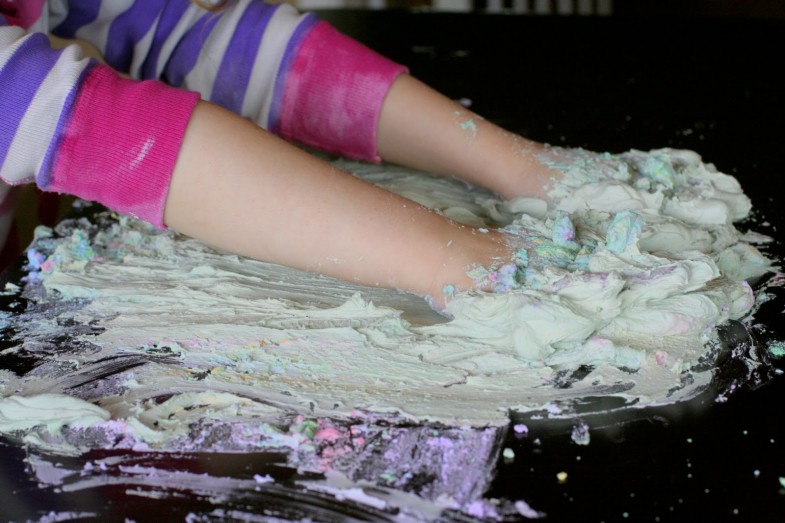
Rainbow foam dough
Source: funathomewithkids.com
This post contains affiliate links for your convenience.
I was expecting it to be pretty fun, but WOW IS IT FUN. You really ought to try it. Because you will LOVE it. We had one of S’s grandmas staying with us this weekend and she and I just could not stop playing with this dough. It’s a safe bet that an activity is a total win if any adults around are just as engrossed with playing as the kid(s). Now that I’ve hopefully convinced you to try it, I will warn you that it is messy. Like really messy. Maybe the messiest thing I’ve played with? It cleaned up just fine for us, but I am thinking most people would rather play with this in a big bowl/tub/bin outside.

Foam Dough has two ingredients in a roughly one to one ratio – cornstarch and shaving cream I wanted to make rainbow Foam Dough, because, well – rainbows!!!! So I started by coloring the shaving cream because I figured that would be easiest – I added Colorations Liquid Watercolors, but you could also use food coloring (this, coincidentally, is how we make Shaving Cream Paint).
Then I slowly added cornstarch to each cup and stirred until it started looking ever so slightly doughy. We kept our dough on the wet side because it was so much fluffier. The more cornstarch you add, the drier the dough, but it does lose some of that amazing foamy-puffy texture. Ultimately I’d say our foam dough ended up being slightly more shaving cream than cornstarch.
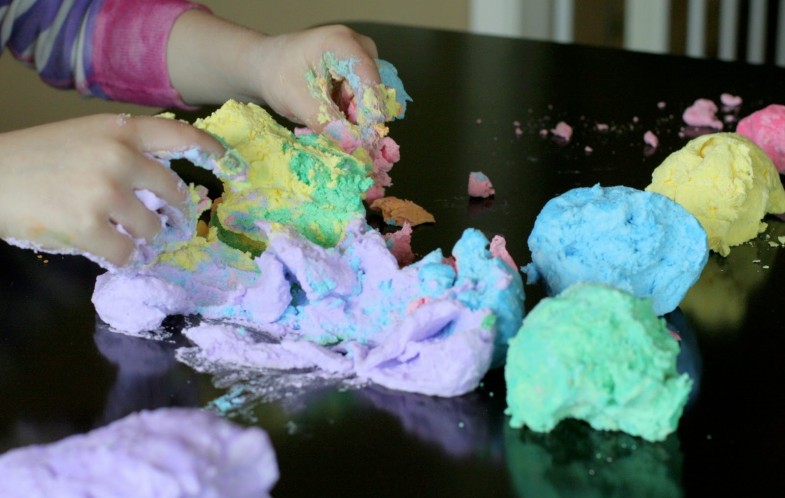
It really is just so foamy and puffy and fluffy and AMAZING. It’s like touching a cloud or a marshmallow…or maybe a marshmallow cloud? Anyway, the pictures simply do not do it justice.
You can roll it into pretty little balls.

Smooooosh.
It really was such a blast and so unlike any other material we’ve played with.
We sincerely hope you’ll give this one a try – it is something you must experience!!!!
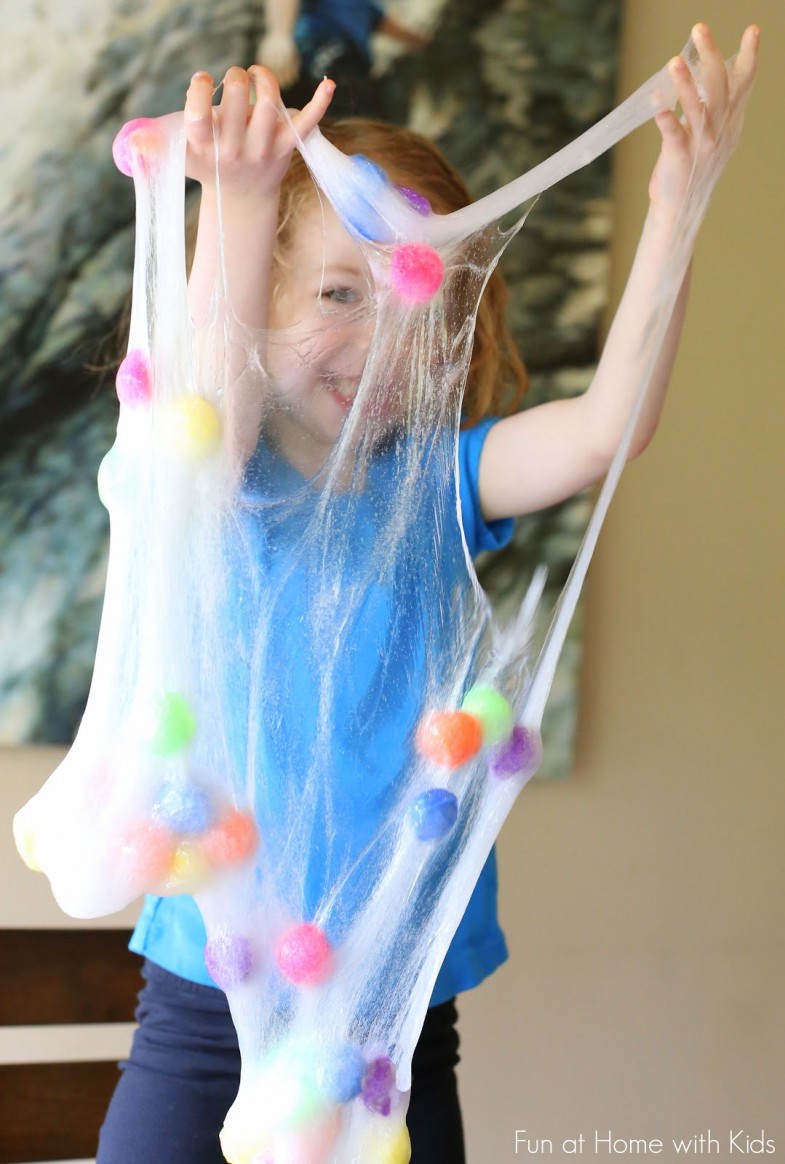
Polka dot slime
Source: funathomewithkids.com
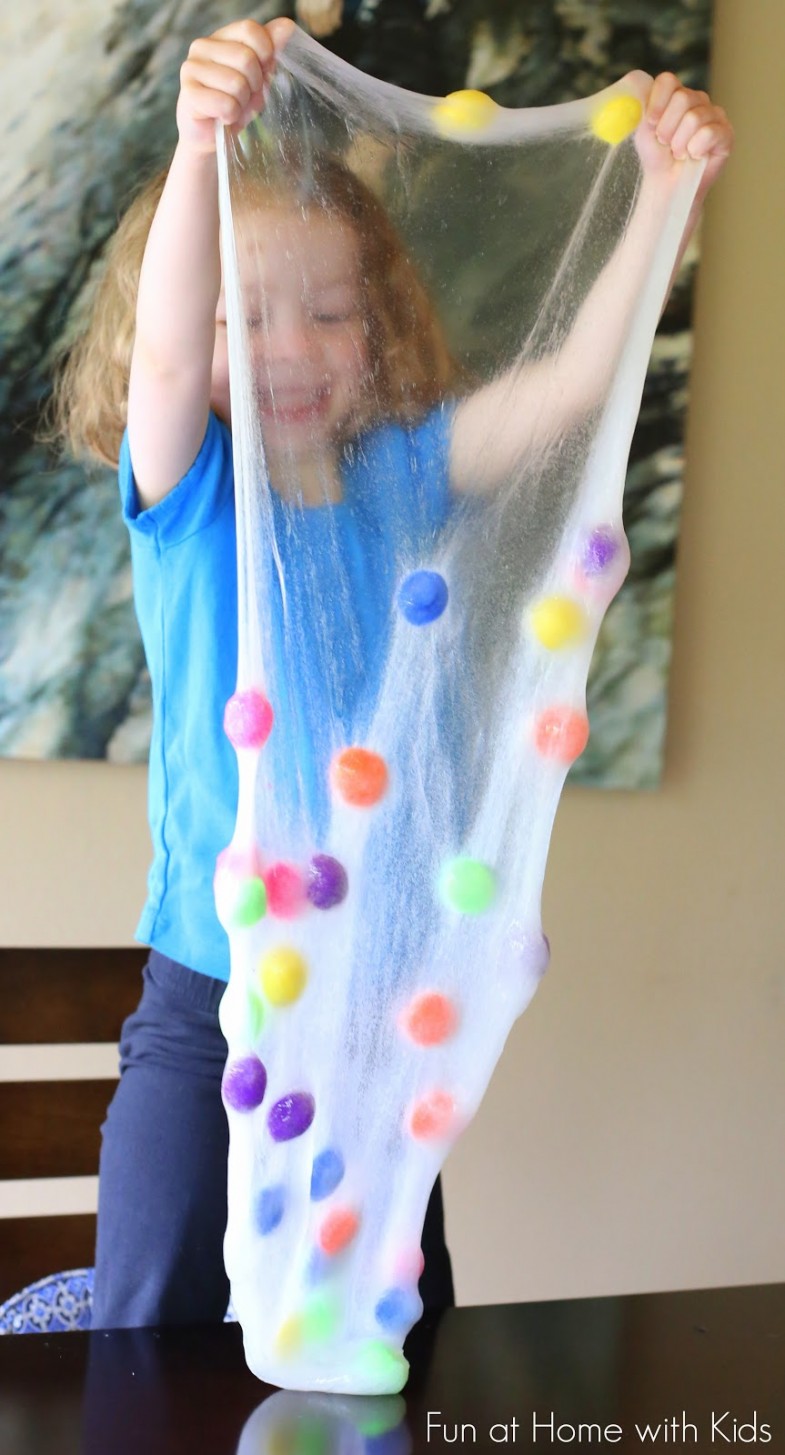
SO. MUCH. FUN.
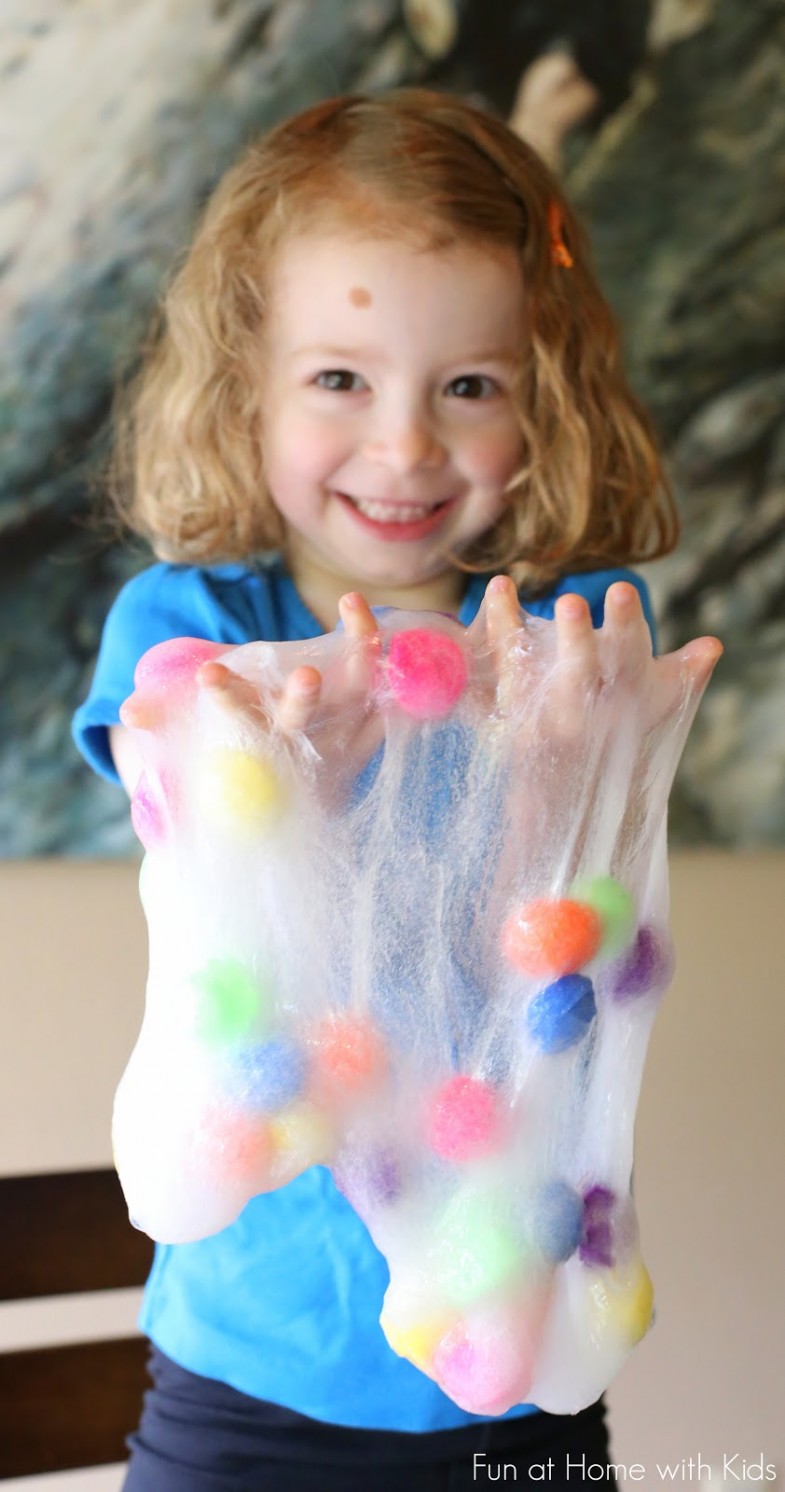
Making little mini-slime polka dots.
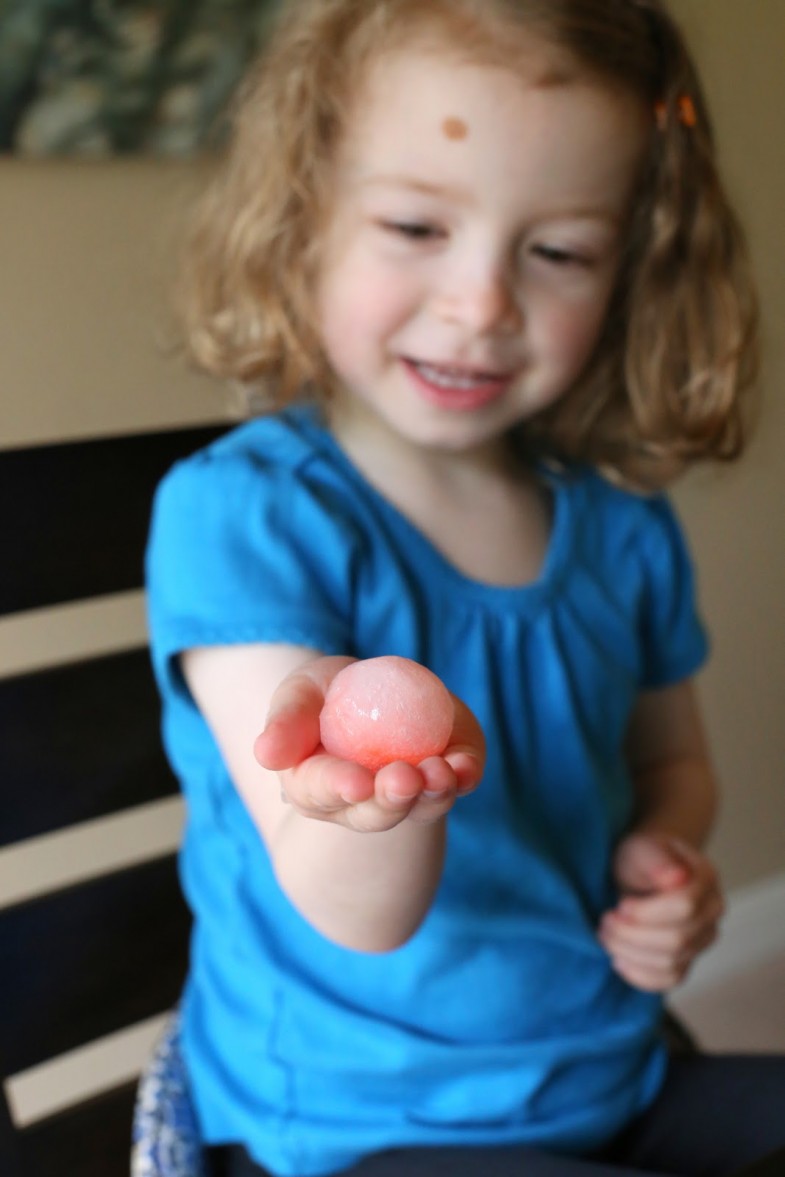
Fried slime egg, anyone?
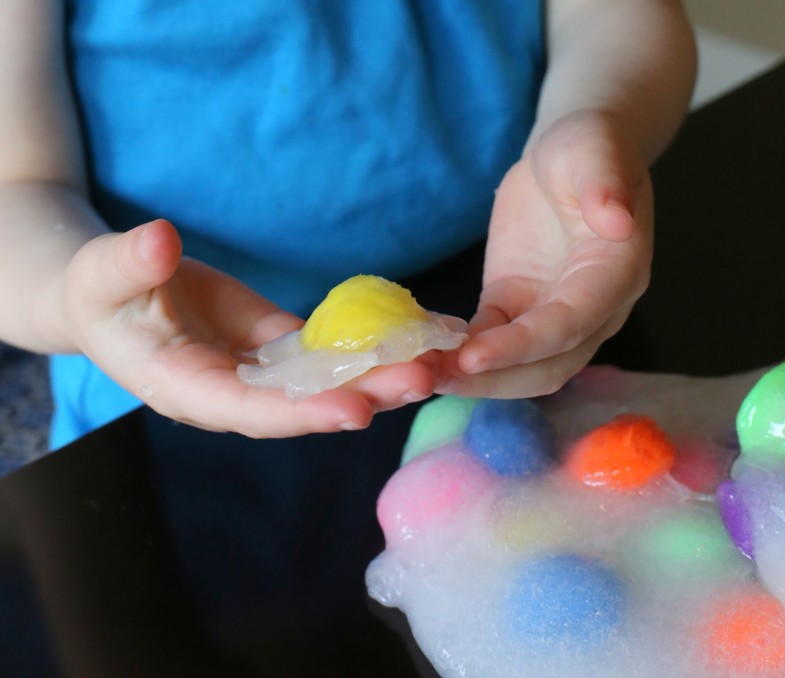
Eeeek! It was just so fun to play with.
this slime is meant only for children who are no longer mouthing and understand not to put their hands in their mouth. Glue and Liquid Starch are not meant for little tummies! If you do have a little one who’s still mouthing – never fear – we’ve developed a super rad Edible Slime here.
Now for those of you with older children, here’s how to make your very own batch of ULTRA fun Polka Dot Slime:
2 five ounce bottles of clear school glue
Pom poms
Pour two full five ounce bottles of clear glue into a cup or bowl. I recommend adding a little bit (on the order of Tablespoons) of liquid starch at a time and stirring well in between each addition of liquid starch. You want to keep adding until the slime is no longer sticky/stringy/sticking to the sides of the bowls. Once the slime is formed and you’ve kneaded to make it uniform, add your pom poms and knead them in. We added 30 medium pom poms
Keep your slime in a sealed container or bag. It will keep for several weeks of play!
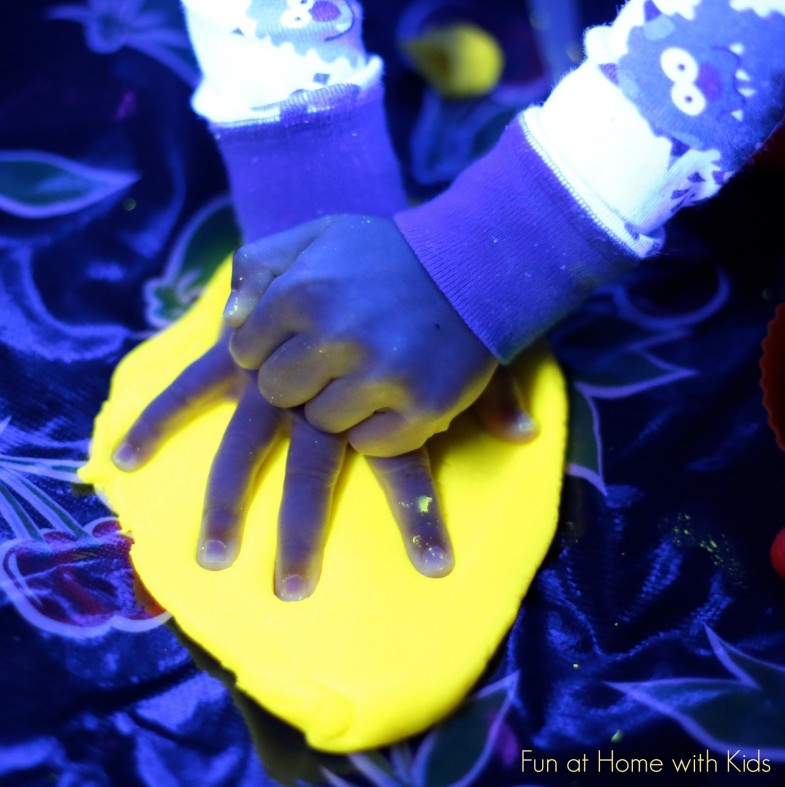
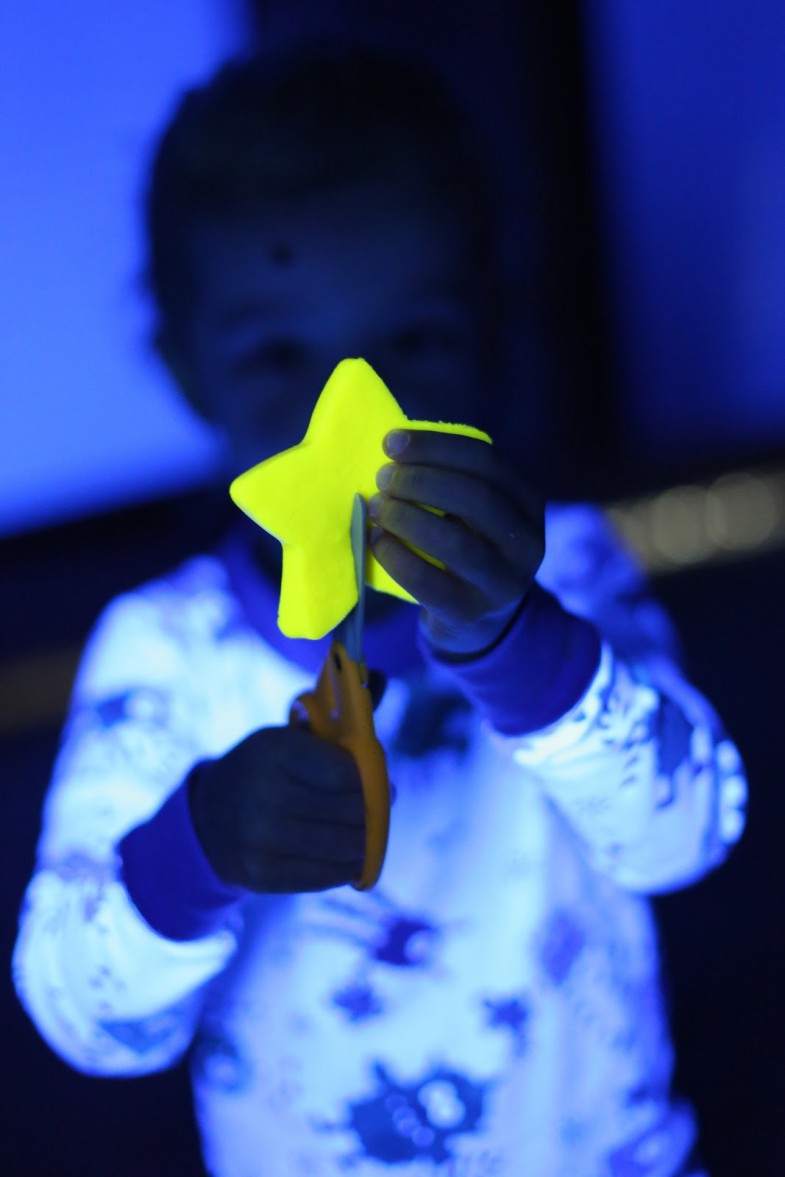
All-natural glowing play dough
Source: funathomewithkids.com
This playdough is all natural and you should be able to pick up all the ingredients to make it at your grocery store. Not only does it glow brightly, but it also lasts for 4-6 months in a sealed container. We just love it!
Glowing playdough makes for a fun twist on all those fine motor skills – like cutting. You can practice cutting a glowing night star!
If you get hungry, you can “bake” a glowing cupcake.
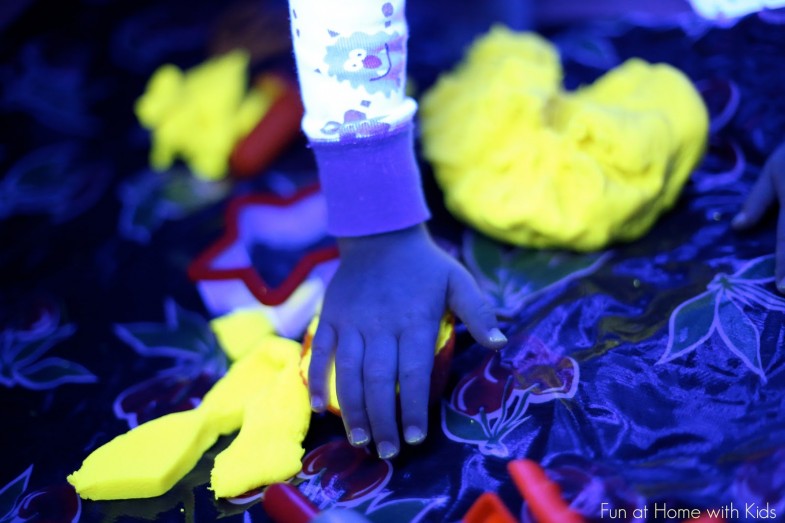
You can use your playdough tools to make glowing spaghetti.
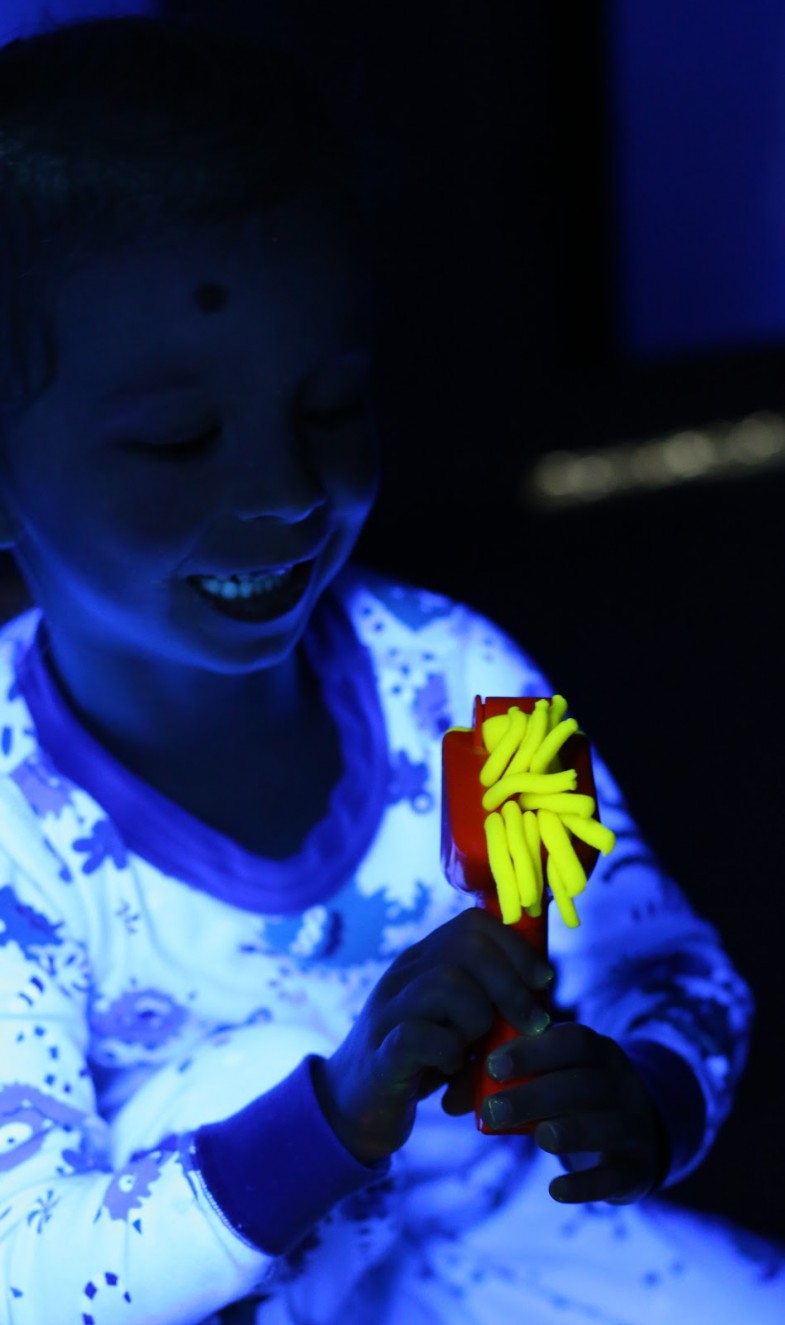
Isn’t it so bright?
It was such a fun twist on our usual playdough play.

This post contains affiliate links for your convenience.
To make glowing playdough, you’ll need:
Our Glowing Vitamin (it goes by many different names, depending on the brand – but most stores carry a version of it. If you want to buy it at a store, write down all the percentages of each ingredient of this vitamin and find one that matches!)
Flour
Water
Vegetable Oil
Cream of Tartar
Salt
Crush 2 of our Glowing Vitamins into a fine powder (if yours are in capsules, open the capsules). Add the vitamin powder to 2 cups of flour, 4 teaspoons of Cream of Tartar, and 2/3 cup of salt and mix until very well combined. Next add 2 cups of warm water and 2 Tablespoons of cooking oil. Whisk this extremely well until there are no lumps. Add it to a saucepan and cook on medium heat until the playdough completely holds together and is no longer sticking to the pan or your spatula. If you are not sure if it is done, take a small bit in your hands (adult only – the playdough is quite hot) and roll it. It should not stick and should have a firm storebought playdough texture. If it is smooshy or sticky, keep cooking it! Once it is fully cooked, allow it to cool for several minutes. Have an adult thoroughly knead it to make sure there aren’t any remaining hot spots before handing it over to a child.
Take the playdough into a dark room and turn on a blacklight to see it glow! The vitamin will give the playdough a bright yellow color – it’s still fun to play with in daylight. Our kids play with it both ways – in daylight and blacklight. When you are done playing, seal it in a Gladware or Ziploc bag for another day of play!
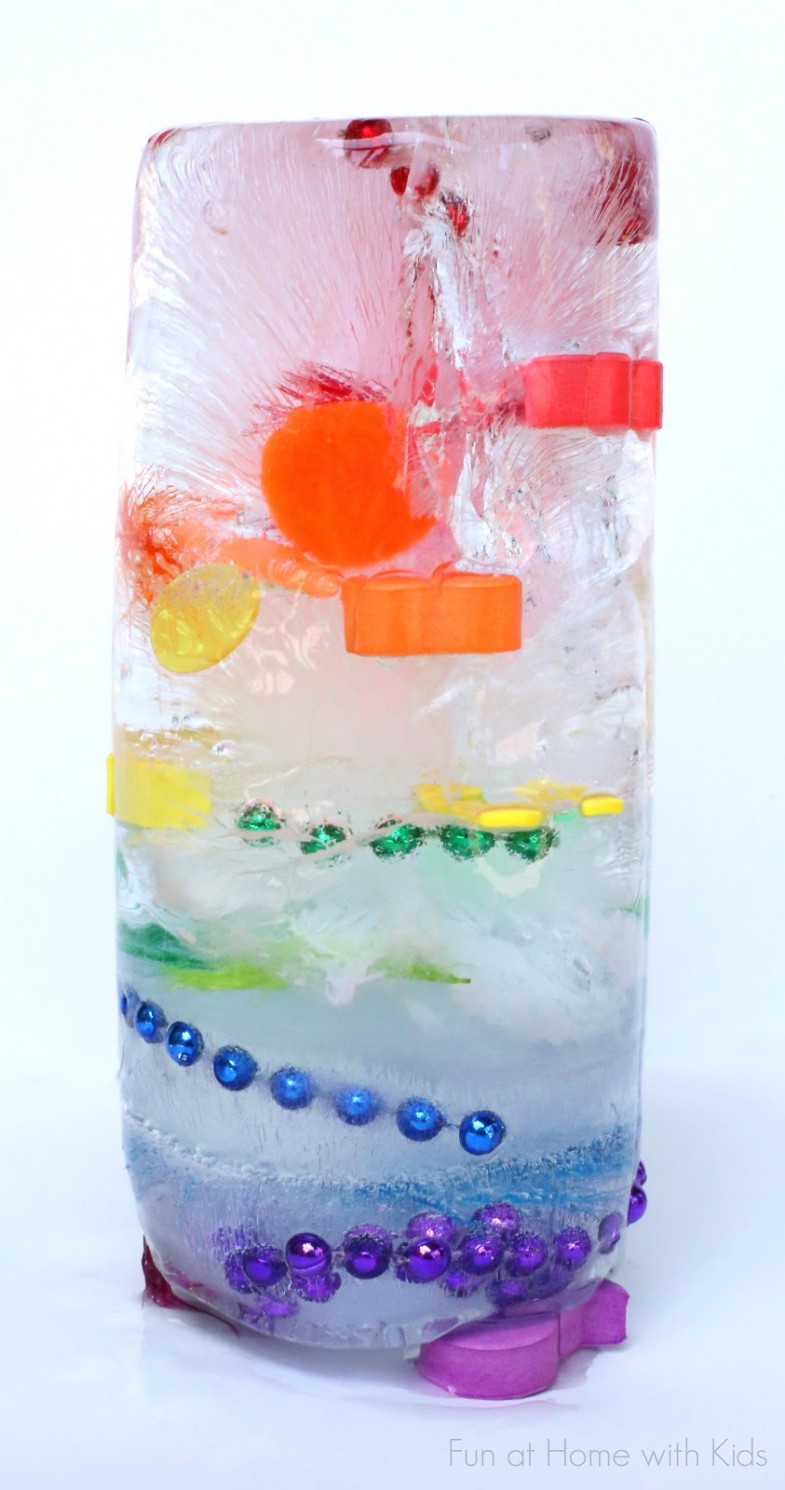
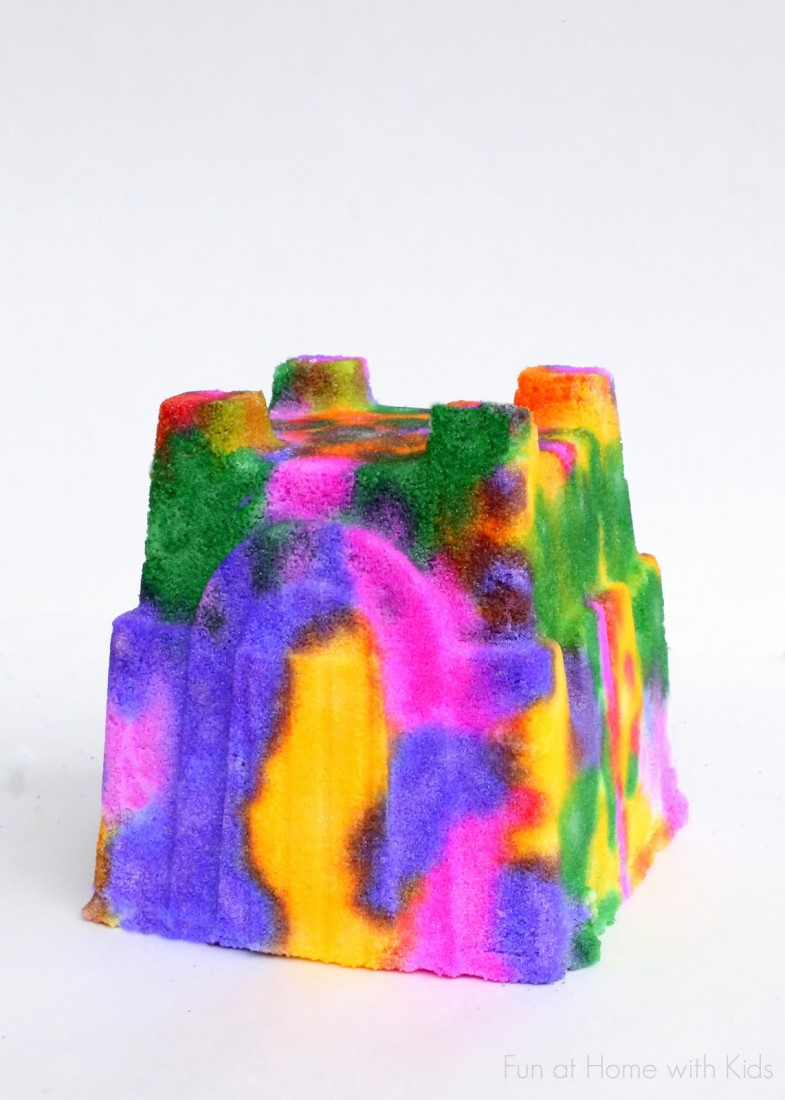
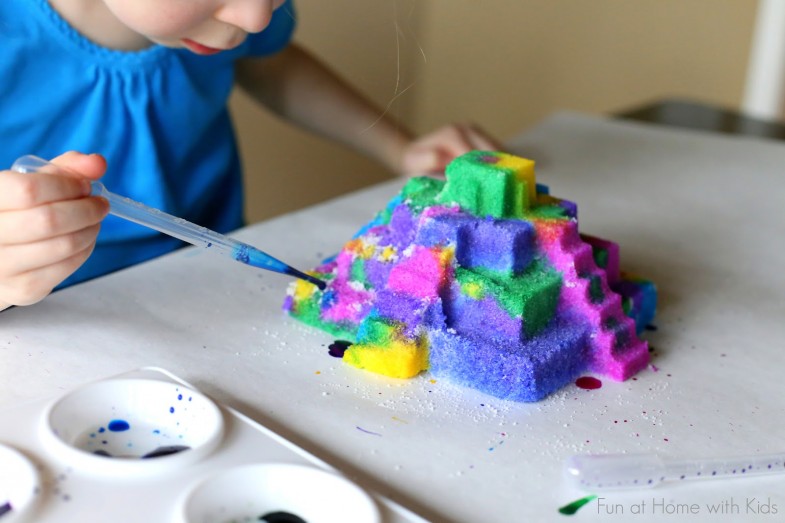
A rainbow ice tower ready for excavation
Source: funathomewithkids.com
This post contains affiliate links for your convenience.
Provide child with eyedroppers, salt, paintbrushes (thanks to a reader tip!), and squeezy bottles filled with water.

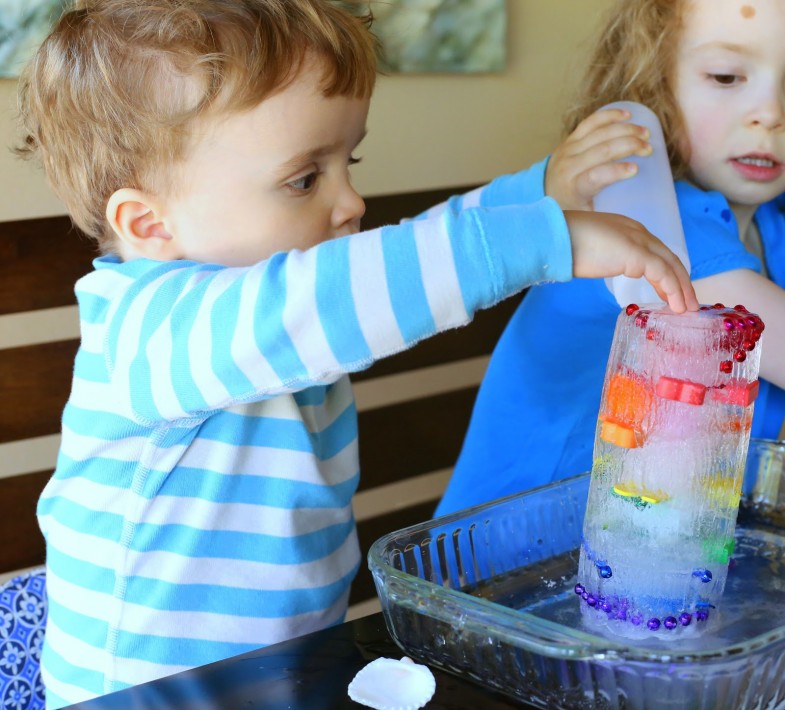
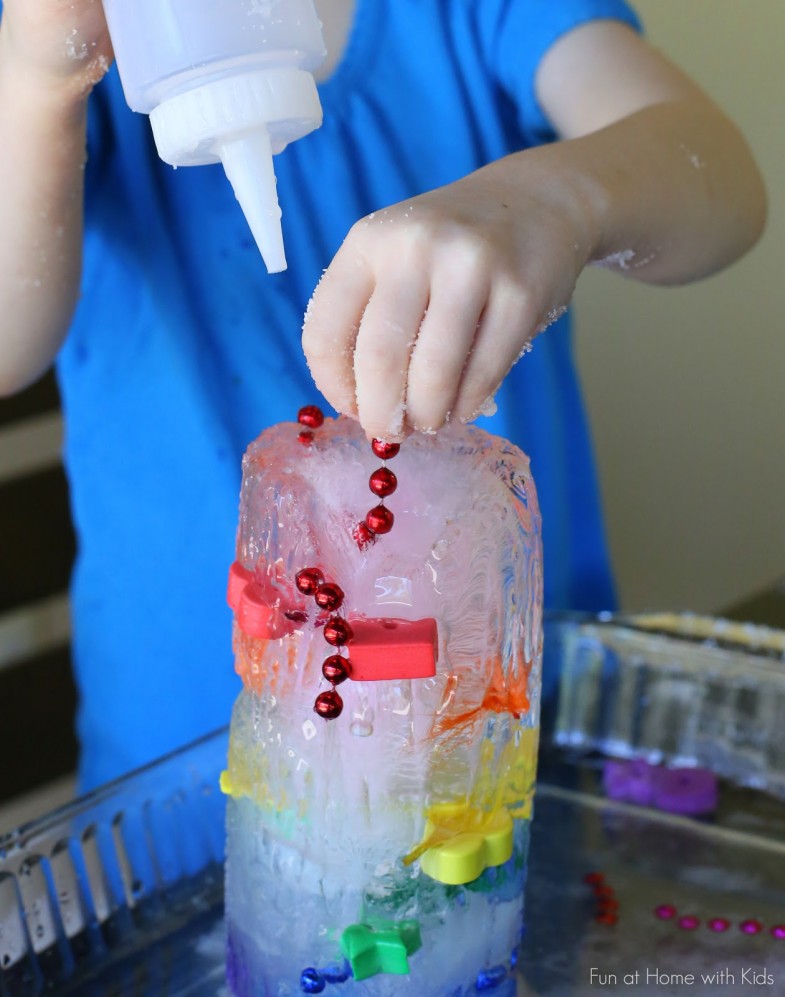
The squeezy bottles were the favorite of the tools presented. And when paired with the salt, we started to see beautiful patterns form in the side of the ice tower as the salt exposed bits melted away.
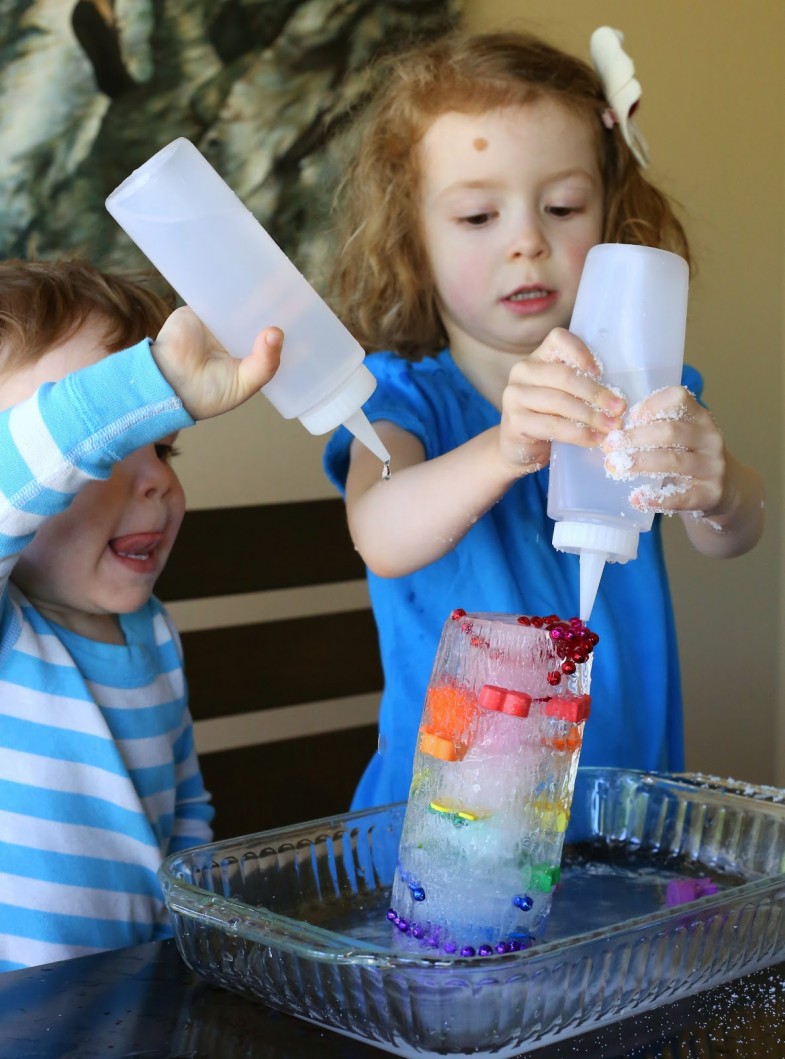
The best part of this intricate tower was that it lasted for not one, not two, but THREE days of play.
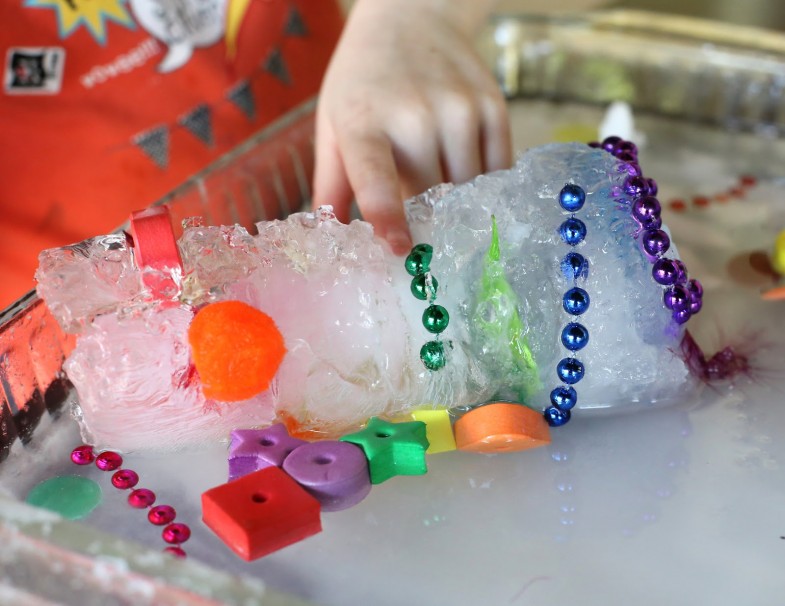
Interestingly, we had a different experience with each of the materials. The foam beads and plastic beaded necklace bits were the easiest to remove. The bingo chips and pom poms presented a moderate challenge. The feathers were the absolute hardest. I’d say if your child is younger, go with foam bits/beads and the plastic beaded necklaces (please be aware of choking hazards if your child is under 3); if your child is older, add feathers for an additional element of challenge.
To make your own Rainbow Ice Tower, you’ll need:
Bits and pieces in rainbow colors
Water
A tall vase or container
I used a muffin tin to gather bits and pieces in a variety of colors from our art supplies. Once we had that, I took a tall vase and measured out how much water it would take to fill and divided by six (one layer for each color). We used a Dollar Tree vase and it took 3/4 cup of water each time. I added 3/4 cup of water, added our red items, and placed it in the freezer for a few hours. I placed the remaining water in the refrigerator. Using 3/4 cup of refrigerated water, I added the orange items on top of the now frozen red items and so on and so forth until I had all six layers frozen. To remove the ice tower, I ran water over the outside of the vase and held it upside down. If you don’t have heat tempered glass, be sure to use caution and use cold water. I got a little impatient and used hot water and managed to crack our Dollar Tree vase (oops!) so learn from my mistake.
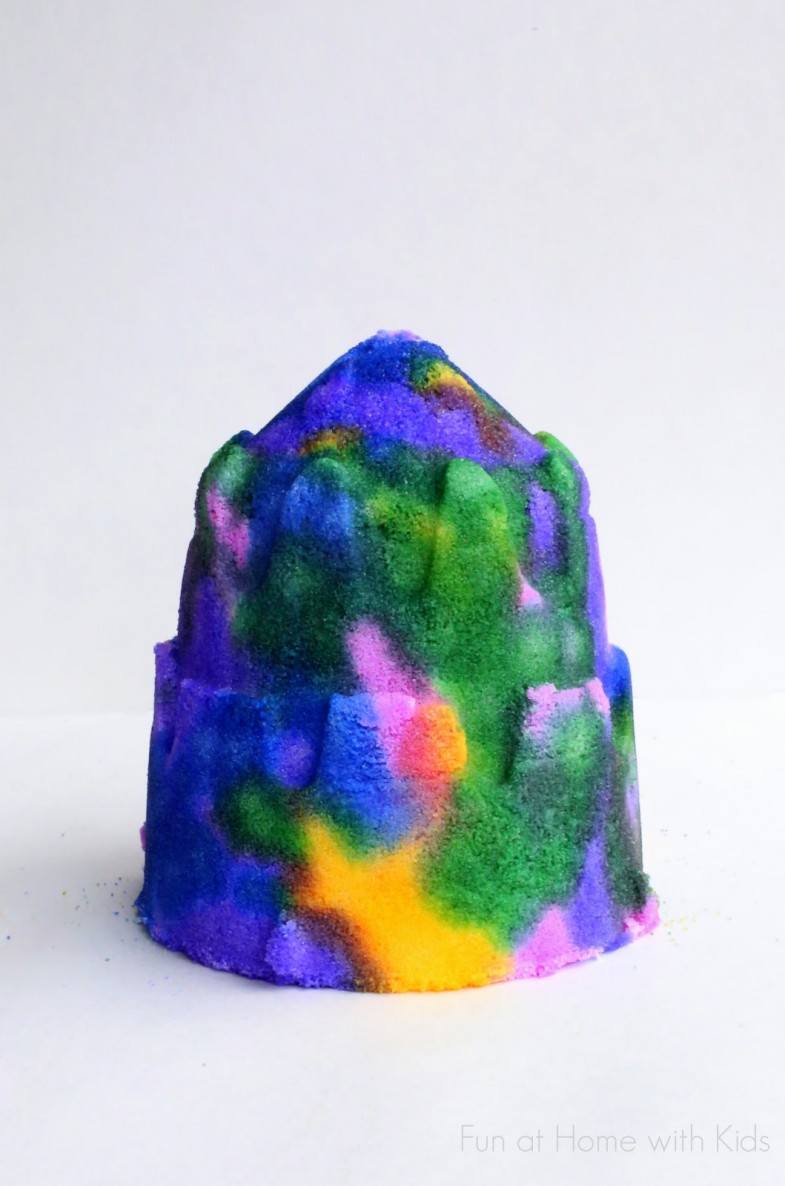
You can use anything as a mold for the salt sculptures – this was shaped by the bottom 2/3rds of one of our drinking glasses – but by far the easiest thing to use are those hard plastic sandcastle molds. We found that the glass gripped the molded salt for a few hours even after we tipped it upside down, whereas the hard plastic sandcastle molds released the salt sculptures right away.

Any shape of sandcastle mold works – though the longer shapes are slightly less stable than the square shapes.
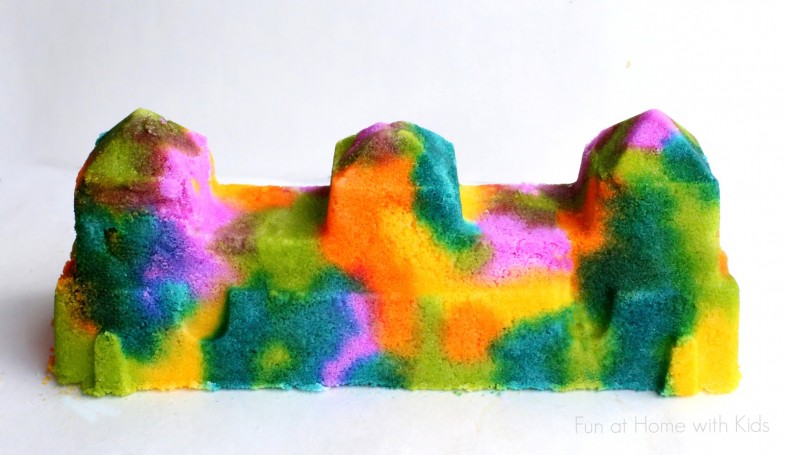
The square shaped sand castles are the hardiest.
This post contains affiliate links for your convenience.
To paint the salt sculpture, we really recommend using liquid watercolors. If you don’t have some, you can mix up some diluted food coloring. Though you can use a paintbrush to paint them, the bristles can disturb the salt a bit, so we recommend using eyedroppers if you can.
It’s so beautiful to watch the color fan out through the salt!

To make your own salt sculptures, you’ll need:
Some sort of mold (sandcastle, drinking glass, anything you can think of!)
Table salt
Water
Add 3 cups of salt and 3 teaspoons of water to a bowl. Stir extremely well – every bit of salt should appear wet/crumbly. If there is still dry salt, continue to stir. It shouldn’t be necessary to add more water, but if for some reason after a lot of stirring you still have dry patches of salt, add 1/4 teaspoon of water. Once your salt is uniformly crumbly and damp, spoon or pour it into your mold and press hard to compact it. Leave it in the mold for at least 12 hours (24 hours or more is best). After that, you can flip it over and it should slide out of the mold. Allow it to dry for an additional 12 or more hours (24 hours or more is ideal) after it’s been removed from the mold. Because it takes so much time to dry, I made these after the kids were asleep one night, and didn’t mention it to them until they were ready (so they didn’t get frustrated with the dry times).
Check that it is dry and solid to the touch before painting it with liquid watercolors (or dilute food coloring). Before painting it, transfer it to a container or paint it in a spot where you can leave it to dry undisturbed for 12 or more hours. Once painted, it will be very delicate until it dries once again and moving it by hand will result in a crumbled sculpture.
Once it has completely dried, it is pretty solid. I’m sure if you dropped it, it would shatter, but you can easily handle/move it. You can keep the sculptures on display, or you can break them with a hammer or mallet and use the salt for sensory play or art!
Though the ultimate answer was pretty simple, it took a LOT of tries to get it just right.

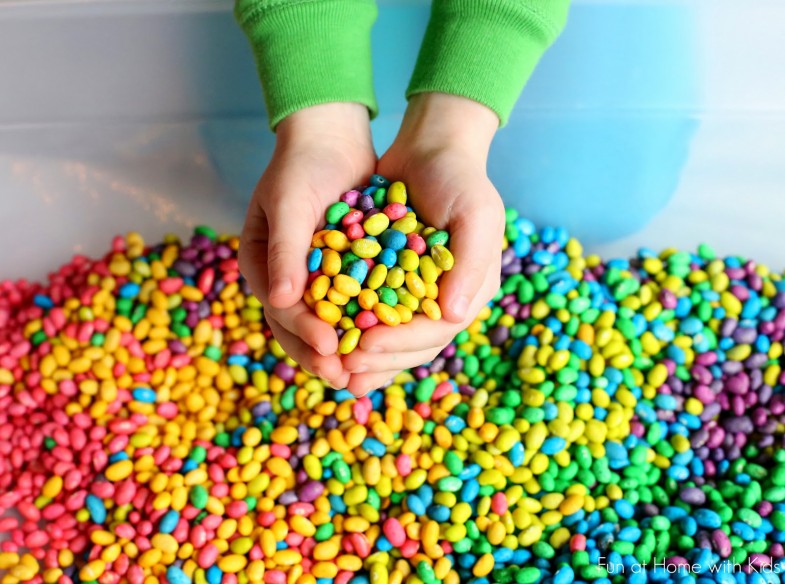
But once I’d finally figured out the method, we had such gorgeous and brightly colored beans that it was all worth it.
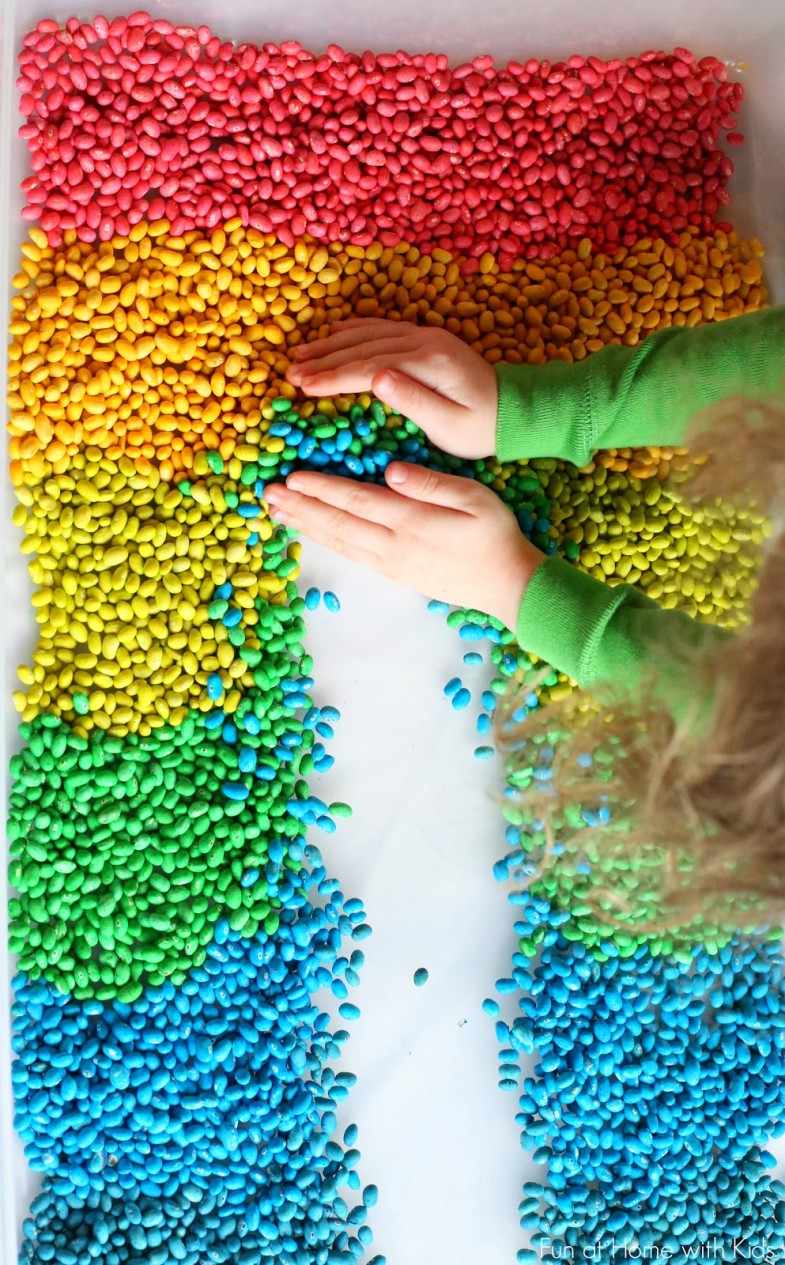
I couldn’t resist a few shots of the full rainbow before the kids dug in.
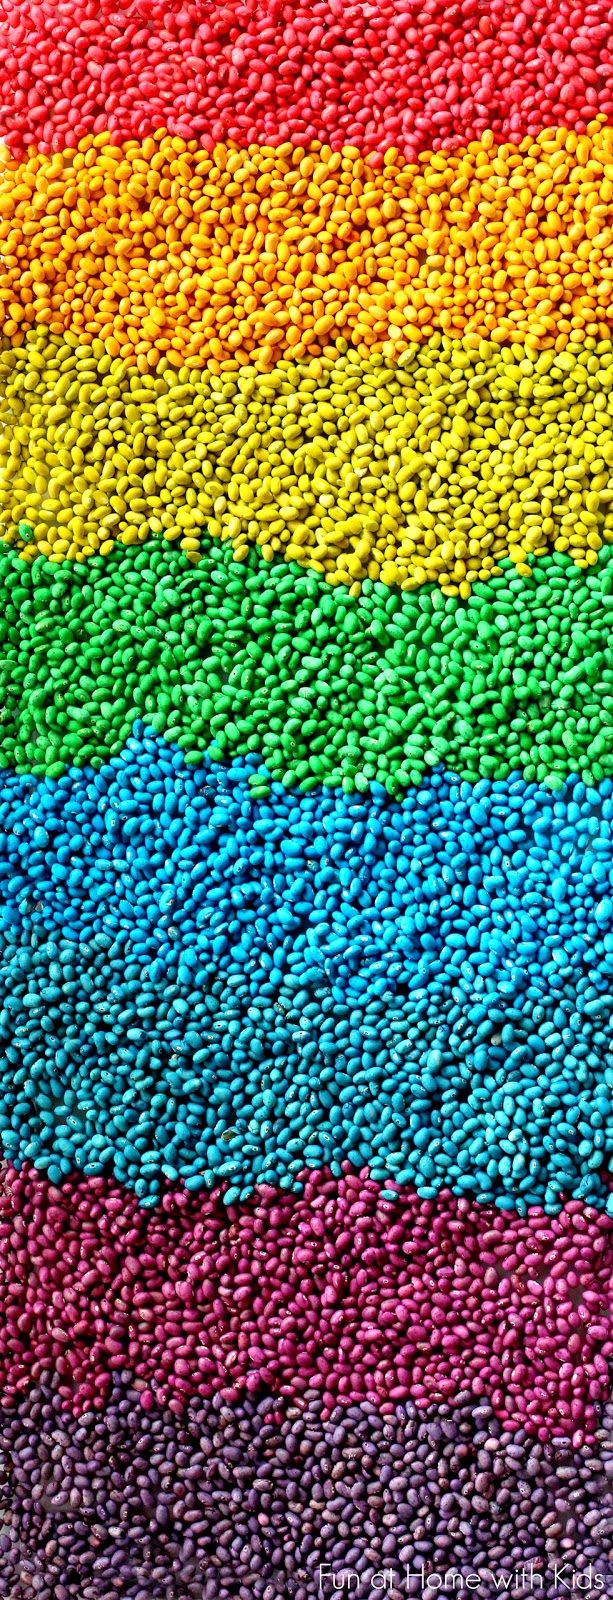
Post children. Still beautiful, though! I think they look a bit like jellybeans, hahaha!
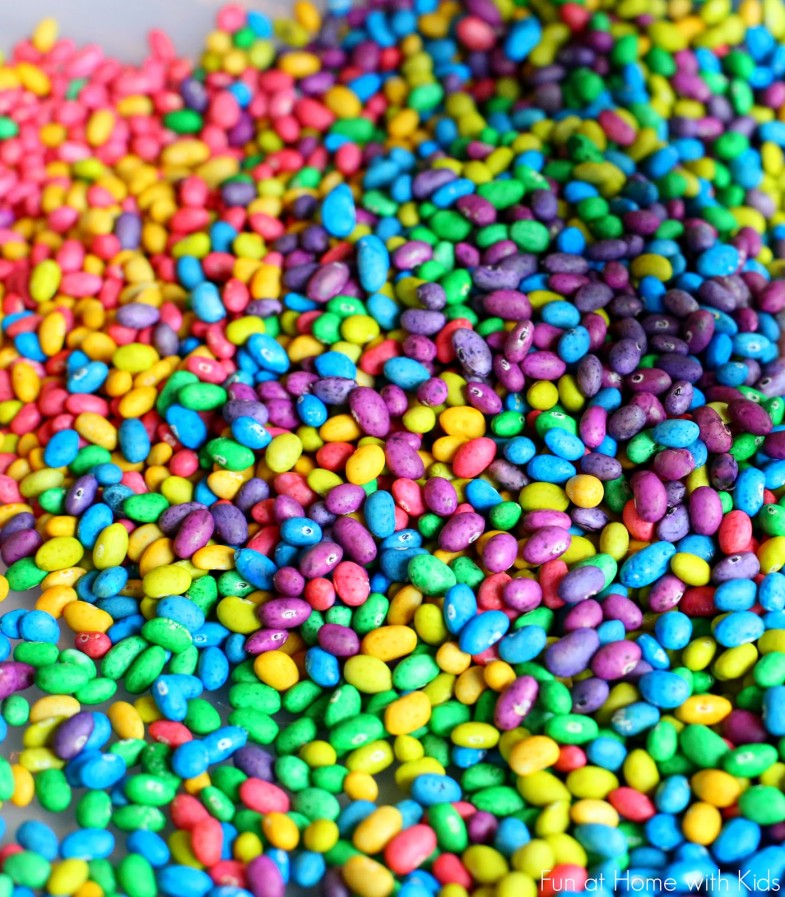
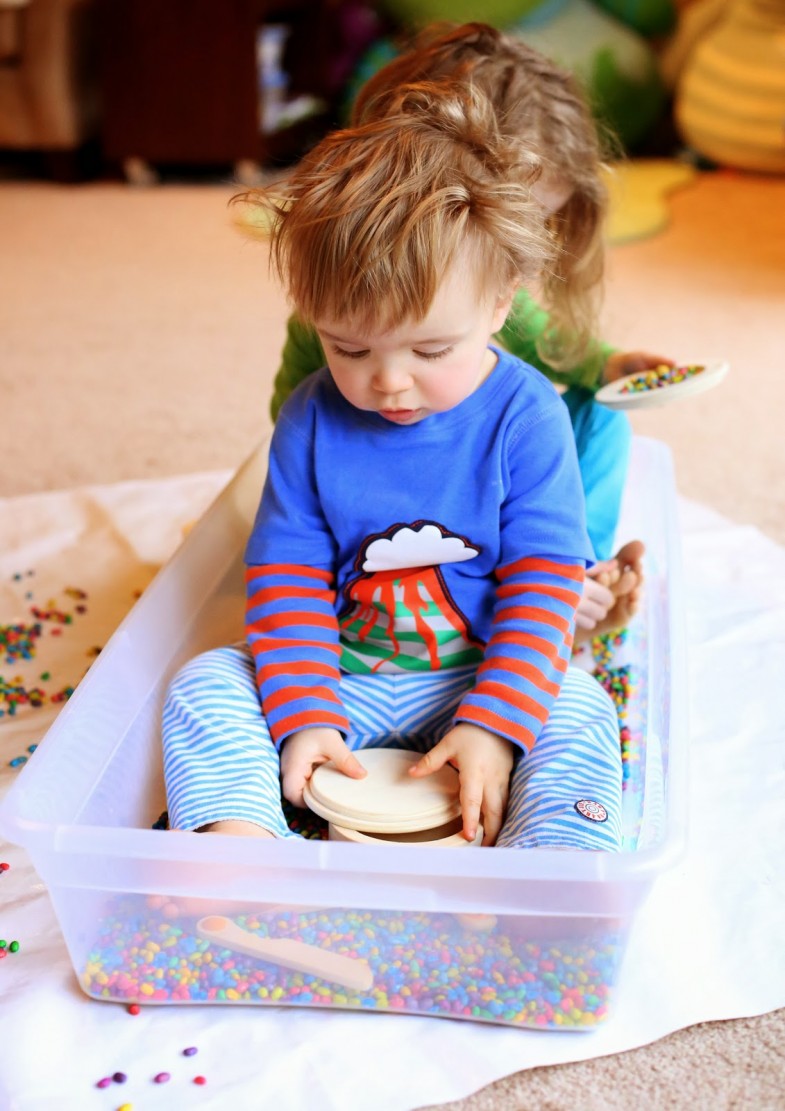
The kids had fun just playing and running their fingers and toes through the beans. Then they decided they’d like some cooking supplies and set to work cooking each other a variety of things.
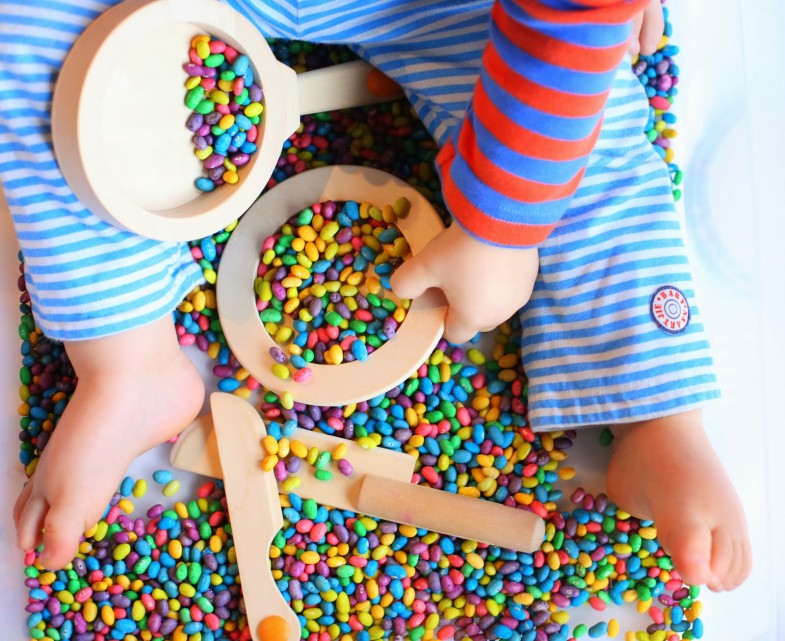
S enjoyed sorting out the beans by color to make separate meals of blueberries (blue beans), spinach (green beans), and eggs (yellow beans). As always, they needed to be IN the bin.
I’d remembered Fun A Day’s post on coloring corn kernels and that she had the same problem initially – she couldn’t get the kernels fully saturated with color. I used the method she outlined, and though it did brightly color the beans, the skins sloughed off. Well, shoot. I tested both liquid watercolors and food coloring and with and without vinegar and with a variety of soaking times and only one method yielded beautiful beans every time. So here’s how to do it. Buy a lot of beans – any lightly colored bean will do. Lima beans, white navy beans (what we used here), even pinto beans (you can usually score big bags of pintos at the Dollar Tree!). Measure a cup of beans into a container. We used a tupperware (Gladware) container, but a bag would probably also work. Add one cup of beans and 15 drops of whatever food coloring (food dye) color you wish. To get the rainbow of colors you see here I used a combination of regular food coloring
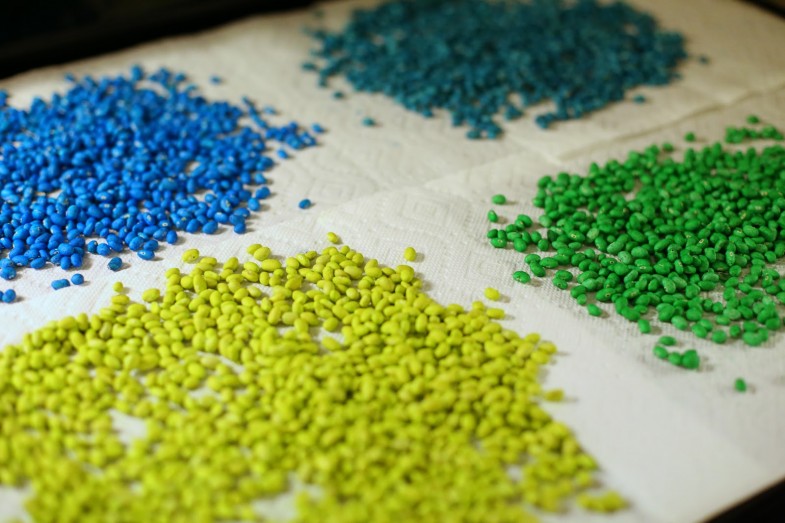
The beans will last for several months, if not longer, so long as they are kept dry. We’ve had ours for about 3 months now and they are just as bright and vibrant as ever. We keep them in a plastic shoe storage box when we’re not playing with them.


