


Source: buzzfeed.com
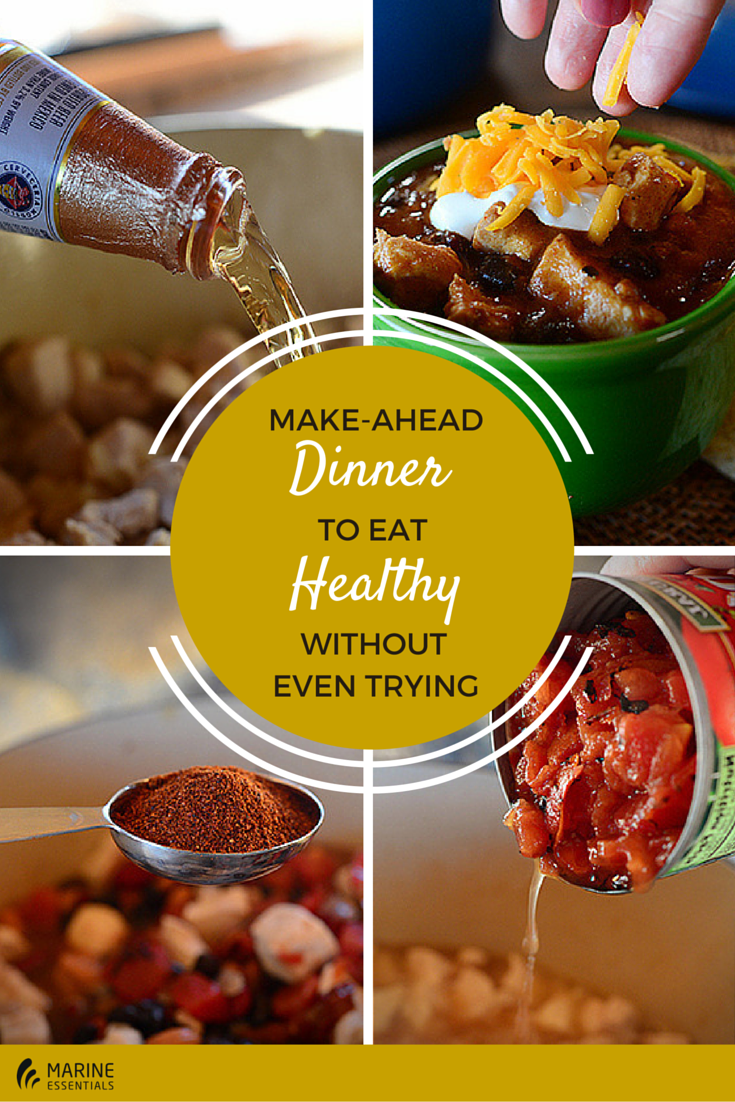
1. Make this chipotle chicken chili.

Then freeze the leftovers as single portions in individual bags or plastic containers to heat up as the week goes on. Get the recipe here.

Mince up some onion and garlic…

And throw it into a pot with a little oil.

Stir and cook it around for a few minutes, until the onions start to get translucent-ish.

Cut up whatever meat you’re using into cubes. This is chicken breast, but as I said, I use Turkey on The Chew…and you could also use stew meat, ground beef, ground turkey, pork, etc. You’ll just need to adjust the simmering time to fit whatever meat you’re using (i.e. beef stew meat will take a little longer to get tender.)

Ater the onions have cooked, throw the meat into the pot…

And stir it around until it’s starting to brown on the outside.

Next, crack open a bottle of the hard stuff! Add 3/4 of a bottle of beer. This is a good Mexican beer, but you can use whatever kind you want. And if you aren’t the beer type, just use low sodium chicken or beef broth (depending on the meat you’re using) instead!

Let the beer bubble up and cook for a few minutes…

Then pour in a can of diced tomatoes, juice and all.

Then, if you love spicy food, which I do, mince up three canned chipotle chilies packed in adobo sauce (these are in the Hispanic Foods section of the grocery store)…

And add them in to the chili.
Now, about the chipotle peppers: They’re spicy, man. There ain’t no getting around it. Three chipotle peppers results in a very spicy chili. I love spicy food more than life itself, but I realize a lot of people don’t. So you could definitely pull back to one minced chipotle pepper, which would give the chili a slight spice and great smokiness…or, to be safe, you could leave out the chipotle altogether. The chili is still delicious without it!
The best approach with chipotles, if you’re unsure, is just to start with one pepper or half of a pepper and work your way up.

Okay, after you’ve settled the spice issue, drain and rinse whatever kind of canned beans you like. I did a mix of kidney, pinto, and black, but you can use all of one kind if that’s what you have.

Throw the beans right into the pot…

And stir it around to combine everything.

Add a tablespoon of chili powder (and again, you can start with a teaspoon and work your way up here if you’re unsure.)

And a good tablespoon of cumin.
I want to marry cumin. I love it so much.

Next, add about a teaspoon of salt…

And stir everything around to combine.

Cover the pot and simmer the chili for 1 hour…
And now it’s time to thicken it.

My favorite way to thicken chili is to use masa harina. Masa is a corn flour used to make tortillas (I use both all-purpose flour and masa harina mixed together to make a flour/corn tortilla that I love) and you can find it in the same aisle as the chipotle peppers. Grab a small amount…

And mix it with the beer that’s left in the bottle from earlier.
That is, if you didn’t drink it already. If you drank it already, just mix the masa with a little warm water.

Mix it all together until it’s a smooth paste…

Then pour it right into the pot!

Next, squeeze in the juice of a lime…

And stir everything together. Let it cook for another 10 minutes or so; the masa will thicken the chili and give it the MOST incredible corn flavor.
And by the way, I use masa to thicken whatever chili I’m making. The flavor it adds to the mix is just irreplaceable. It is heaven.

Hello, beautiful!

Serve the chili in a bowl…

Ingredients
- 1 cup quinoa (I used a combination of red and white)
- 2 cups water
- 1/2 teaspoon salt
- juice and zest of one lime, or 2 tablespoons lime juice
- 1/4 cup chopped fresh cilantro
- 2 large chicken breasts
- 2 teaspoons sea salt
- 1 tablespoon coconut oil or ghee
- 2 pieces of thick cut bacon
- 1 large sweet potato, washed, with both ends cut off
- 1 tablespoon residual bacon oil or coconut oil
- 3 cups chopped lettuce
- 5 tablespoons plain Greek yogurt
- 3/4 cup shredded cheese
- 1/2 cup chopped fresh cilantro
Instructions
- Add the quinoa, water, and salt to a medium sized pot. Bring to a boil over medium heat. When it has reached a boil, cover and cook for 20-25 minutes, or until the quinoa is soft and fluffy.
- Set the quinoa aside to cool.
- When it has cooled, add the lime juice, lime zest, and 1/4 cup chopped cilantro to the rice and stir to evenly distribute the ingredients. Taste, and add more lime or cilantro as needed.
- Dry off both chicken breasts thoroughly with paper towels, and season both sides of each breast using the 2 teaspoons of salt.
- In a large skillet, heat 1 tablespoon coconut oil or ghee over medium-high heat until the oil is very hot.
- Add the chicken breasts to the hot skillet, and cook for about 4 minutes on each side. Both sides should have a pretty brown sear to them.
- When the chicken breasts are cooked all the way through, remove them to a cutting board to cool. Once they’ve cooled, cut the chicken into small chunks, about 1/2 square inch each.
- If you’re going to add bacon to your salad, cook 2 slices of bacon as you normally would, until it is crispy enough to crumble. Reserve 1 tablespoon of bacon fat for the sweet potatoes.
- Cut up the sweet potato into tiny chunks, about 1/2 square inch each.
- Heat 1 tablespoon of bacon fat (or, if you didn’t use bacon, coconut oil) in your large skillet over medium heat.
- When the oil is hot, add the sweet potato cubes. Sear the potatoes on all sides, stirring every 3-5 minutes.
- When the potatoes have all browned on the outside, turn the heat down to medium-low, cover the skillet with a lid, and cook the sweet potatoes until they can be easily pierced with a fork. Set aside to cool.
- When all ingredients have cooled, you can begin to assemble your burrito bowl salads. Add 1 tablespoon of plain Greek yogurt to the bottom of each pint-sized wide mouth mason jar .
- Top with about 2 tablespoons of sweet potato cubes.
- On top of the sweet potatoes, add 3-4 tablespoons of the cilantro lime quinoa.
- Layer 1-2 tablespoons of cheese over the quinoa, a little less than half a piece of bacon over the cheese, and a layer of chicken over the bacon. (To make this vegetarian, substitute 1 can of rinsed beans for the chicken and bacon and add a layer of beans here.)
- Fill the remaining space in the mason jar with lettuce, and sprinkle some additional chopped cilantro on top before screwing on the lid.
Recipe Source: strictlydelicious.com
3. Prep and stash some stir-fry freezer meals.

Get the step-by-step how-to here, via The Kitchn.
How to Prepare Stir-Fry Freezer Meals
What You Need
Ingredients
Each batch makes 1 frozen stir-fry dinner and serves 2 people; multiply these ingredients as needed for the number of dinners you plan to make
For the stir-fry base:
1/2 cup uncooked white or brown rice
3/4 to 1 pound chicken breasts or thighs (substitute pork, beef, or tofu)
2 cloves garlic, smashed
1 bay leaf
1 bell pepper (or other vegetable, equal to 1 cup chopped)
1 cup sugar snap peas (or other vegetable, equal to 1 cup chopped)
For the stir-fry sauce:
2 tablespoons soy sauce
2 tablespoons dry sherry
2 tablespoons water, chicken broth, or vegetable broth
2 tablespoons brown sugar
1 tablespoon rice wine vinegar
1 teaspoon sesame oil
1 teaspoon cornstarch, optional for a thicker sauce
Equipment
To prepare the frozen meal:
2- to 4-quart pot
Chopping board
Chef’s knife
Baking sheet
Parchment
Freezer bags or containers
To cook:
Bowls
Large skillet or wok (non-stick is ok)
Instructions
- Prepare the rice: Prepare the rice according to its package directions, or follow this tutorial for How to Cook Rice on the Stovetop. When done, spread the rice on a baking sheet to cool, then transfer to freezer bag or container. Refrigerate until ready to freeze with the other ingredients.
- Poach the Chicken: Place the chicken in a pot and add the garlic and bay leaf. Cover the chicken with a few inches of water. Bring to a full boil over medium-high heat, then turn the heat to low, cover the pot, and let the chicken simmer until cooked through and the interior registers 165°F on an instant-read thermometer, 10 to 13 minutes depending on the thickness of the chicken.→ Pork or beef can also be poached in this manner. You can also cook the meat on the stovetop or grill — cook until just barely cooked through. Tofu does not need to be pre-cooked.
- Slice the Chicken: Cut the chicken into thick slices, then cut each slice into bite-sized pieces. Make sure that the pieces are as uniform in shape and thickness as possible.
- Transfer the Chicken to the Baking Sheet: Line the baking sheet with parchment and lay the chicken in a single layer over 1/3 of the baking sheet (leave room for the vegetables). Some overlapping is ok, but avoid big clumps of chicken. If needed, lay a second sheet of parchment over the first layer of chicken and lay the remaining chicken on top.
- Prepare the Vegetables: Slice the pepper (or other vegetables) into bite-sized pieces. Trim the ends from the sugar snap peas.
- Transfer the Vegetables to the Baking Sheet: Arrange the vegetables in a single layer over the remaining space on the baking sheet. Some overlapping is ok, but avoid big clumps. If needed, lay a second sheet of parchment over the first layer of vegetables and lay the remaining vegetables on top.
- Freeze Until Solid: Freeze the vegetables and chicken until solid, at least 4 hours or overnight.
- Package the Ingredients into Freezer Bags: Place the frozen chicken in one bag and the frozen vegetables in a second bag. Make sure to press as much air out of the bags as possible. Alternately, vacuum-seal the ingredients. → Tool Tip: If you don’t have a vacuum-sealer, the best way to get the most air out of a plastic bag is to add the ingredients, partially close the top, then suck out the remaining air with a straw.
- Prepare the Sauce: Whisk together the ingredients for the sauce, then pour it into a freezer bag. Press out as much air as possible before closing and make sure the bag doesn’t have any holes or leaks.
- Package the Stir-Fry Dinner Together: Place the bags of chicken, vegetables, rice, and sauce in a large plastic bag or freezer container. Print or write out the Preparation Instructions (below) and place in the bag. Press out as much air as possible before sealing.
- Freeze for Up to 3 Months: These freezer meals are best eaten with in a few months. Unless vacuum-sealed, the ingredients will gradually start to develop freezer burn.
- Heat Up the Stir-Fry Meal for Dinner: Follow these instructions for assembling the final dish, which will take about 10 to 15 minutes.
To Heat Up & Serve the Frozen Stir-Fry Meal
- Defrost Sauce: Remove the stir-fry dinner from the freezer. Place the sauce in a bowl of hot tap water to thaw.
- Heat Rice: Transfer the rice to a microwave-safe container, cover loosely, and heat for 2 minutes. If not fully warmed, continue heating in 30 second bursts until warm. Keep covered and set aside. Alternatively, the frozen rice can be added to the skillet with the vegetables.
- Cook the Chicken: Warm 2 teaspoons of oil in a large skillet (like a cast-iron skillet) or a wok over medium-high heat. When the oil is warm, add the frozen chicken. Spread the chicken into a single layer and cook, stirring occasionally, until the chicken develops golden spots and is warmed through, 4 to 6 minutes.
- Add the Vegetables: Add the frozen vegetables to the skillet with the chicken. Cook, stirring occasionally, until the vegetables are hot and crisp-tender, 3 to 5 minutes.
- Mix with the Sauce: Pour the warmed sauce over the chicken and vegetables. Stir until the sauce is thickened and coats all the ingredients, about 1 minute.
- Serve: Serve the stir-fry over rice. Leftovers will keep refrigerated for up to a week.
Recipe Source: thekitchn.com
4. Or pull together a whole pan of creamy spinach-and-cheese green chile enchiladas.

You can reheat each individual enchilada (or several) in a microwave in no time. Get the recipe here.
Creamy Spinach and Cheese Green Chile Enchiladas
Yield: Serves 8
Prep Time: 20 minutes
Cook Time: 20 minutes
Total Time: 40 minutes
Love these easy and cheesy vegetarian enchiladas! They freeze well too!
ingredients:
1 tablespoon olive oil
1 small yellow onion, diced
1 clove garlic, minced
10 cups fresh spinach leaves
1 tablespoon fresh lime juice
1/3 cup chopped cilantro
1 can (4.5 ounces) Old El Paso chopped green chiles
1/2 teaspoon ground cumin
1/4 teaspoon ground chili powder
1/2 cup sour cream or plain Greek yogurt
Salt and black pepper, to taste
2 cans (10 oz each) Old El Paso Mild Green Chile Enchilada Sauce
8 Old El Paso Flour Tortillas (Burrito size)
2 cups shredded Monterey Jack cheese, divided
2 cups shredded Cheddar cheese, divided
Toppings:
Green onions, chopped
Fresh cilantro, chopped
Diced avocado
directions:
1. Preheat oven to 375 degrees F. In a large skillet, heat olive oil over medium high heat. Add the onion and cook until softened, about 3-4 minutes. Add the garlic and cook for an additional 2 minutes. Add the spinach leaves and cook until they are wilted and shrinks down. Stir in the lime juice, cilantro, green chiles, cumin, and chile powder. Remove from heat and stir in the sour cream. Season with salt and pepper, to taste.
2. To assemble, spread about 1/2 can of enchilada sauce in the bottom of a 9 x 13 baking dish. Fill each tortilla with about 1/3 cup of the spinach mixture. In a medium bowl, combine both kinds of shredded cheese. Sprinkle cheese over spinach mixture, about 3 tablespoons per enchilada. Roll up and place seam side down in the baking dish. When all enchiladas have been rolled and placed in the pan, top with the other 1/2 can of enchilada sauce and about 1/2 of the other can. We had some sauce leftover. Sprinkle remaining shredded cheese on top of enchiladas. Bake 20-30 minutes or until the cheese is melted, and the sauce is bubbling around the edges.
3. Garnish enchiladas with green onion, cilantro, and avocado, if desired. Serve warm.
Note-these enchiladas freeze well. Cool completely, without toppings, and place in a tupperware container. Reheat individual servings in the microwave when ready to eat! You can also freeze an entire pan and reheat in the oven!
Photo: twopeasandtheirpod.com


